Return

Getting started with the bMoves solution

Overview of the bMoves solution tools

bMoves is your digital solution to gain insights into your field activities and optimize your cost. Thanks to bMoves you can gather several insights and feedbacks about your operations.

We built bMoves to help you in the digitization of your operations. bMoves offers several features and capabilities designed to help you in this endeavor. But starting with every functionality from the get-go can be overwhelming.  That's why we built this course. Doing so enables you to begin quickly and then keep growing.

1. Creating your account

The first step is to create an account. If you already have one, you can skip to the second point of this course. Otherwise, let's go create an account. bMoves features several subscriptions from free to pro. They all offer the same functionalities and number of users. The main difference is how many interventions you can do. So you can choose to start directly with a paid subscription to answer your needs. But you can also start with a free account and upgrade to a paying subscription later. 

Registering for a free account is very straightforward. Register for a free account now. To create your account, you only need to go through 3 steps:

  1. Authentication: You can click on the yellow "Next" button. This step is just security. You don't have to do anything. We are running security checks in the background.
  2. Administrator: This screen features the information about yourself as the person creating the account. You will be able to give all the information about your organizations (address, VAT number,...) later. 
  3. This last step displays a summary of what you entered. Before confirming your registration, you need to accept our Terms of Service. The second toggle is for you to receive several pieces of information and free content regarding bMoves. If you choose to accept it, we will send you from time to time courses, tips, helps, and stuff like that to help you with bMoves.

Once done and clicked on "Finish", you will receive an email. This email confirms that it's your email and activates your account. Just click on the button "Activate my account". You are now ready to sign in to your organization.

Input basic information about yourself
Creation of the administrator
Confirm your account creation
Summary of the created account

The bMoves solution features several tools. So depending on what you want to do, we have an application or website designed for that. 

  • bAdmin (www.badmin.digital) is the administration tool where you input information about your organization and bMoves elements. A bMoves element is everything you create to be used, recorded, or reported from the field.
  • bMoves app (available for iOS and Android) is the mobile application to record your field activities, including data from your vehicles.
  • bVision (www.bvision.digital) is the desktop tool to visualize all your live or past interventions. You can also directly export reports for one or several interventions. 
  • RWIS (available for iOS and Android) is our mobile visualization app where you can visualize live interventions as well as interventions from the near past.
  • bConfig (available for iOS and Android) is our mobile application to configure your ConnectHub and ConnectHub GEO, enabling you to select the data you want to get from your vehicle. To learn more about ConnectHub, check our course.

This course presents you with all those applications and websites and gives you a high-level overview of them. At the end of this course, you will be able to start with the bMoves solution. Then, if you want to go into more details, you can use our dedicated courses.

2. Creating your very first bMoves elements

Now that your account is ready. We can start using bMoves. Before you can start with the bMoves app, you need to enter your very first bMoves elements. bMoves elements are the template of everything you use, record, or report in bMoves app. For example, operators, activities, or vehicles are bMoves elements.

To create your bMoves elements, you need to go to the configuration part of bAdmin. bAdmin is divided into two main sections (available through the menu in the upper left corner), organization and configuration. In an organization, you can edit your organization's settings such as users or subscriptions, while in the "configuration" you can change all your bMoves elements.

You can access the configuration section by clicking the "Configuration" tab in the upper left menu or using the quick links in the bMoves tab of the dashboard, or just click here.

bAdmin - bMoves element creation

The first time you open the configuration screen, you will have a wizard. This wizard helps you create the first bMoves elements you need to get started. Those first steps help you generate your first operator, vehicle, equipment, and activity. 

  1. Operators are the person working during an intervention. An operator requires a name (either the full name or an ID). Secondly, you have to select the roles for this operator. For the time being, you can keep everything ticked. 
  2. Vehicles are all your trucks, cars, etc. If you carry out your intervention in a vehicle, we strongly suggest entering a vehicle here. Vehicles have a name and a registration number. Alternatively, if you don't need it, you can choose to skip this step.
  3. Equipment monitors the physical equipment you are using on the field. Equipment is things like spreaders, mowers, etc. By clicking the checkbox "Link to vehicle", you save that this equipment is installed on the previously created vehicle. Besides its name, you have to enter a type for your equipment. This type enables precise sorting and analysis. So you can choose to be detailed if you have a lot of equipment or keep it simple. Next is the status, used to get more precise information for some featured equipment. For now, you don't need to change anything there. Finally, select the color to apply for this type of equipment.
  4. Activities record everything you do on the field. You will see that you can record a lot of different things depending on your needs. For now, we will create only one activity. The system will automatically create some other activities as templates for you.  Give your activity a name and a category. Categories enable sorting of your activities, similarly to types for equipment. Finally, you can select a color. This color is the one that will be displayed. Each category has its color.

With your activities created, the wizard displays a summary of everything you inserted. If it's ok for you, you can press "Finish". You are now ready with bAdmin. Of course, you can do a lot more with bAdmin. Check our dedicated course for more information. For the time being, let's move to the next point.

Use the wizard to enter your bMoves elements
bAdmin - bMoves element creation
bAdmin - bMoves element creation summary

3. Configuring your intervention in bMoves app

Ok. With everything ready in bAdmin, we can now start with bMoves app. You can download bMoves directly from your Google Play Store for Android or App Store for iOS.

After you signed in bMoves app with your credentials, you land on the page to configure your intervention. On this page, you find a "START" button. As long as you have not pressed on this button, bMoves record nothing.

Before you click on the "START" button, you need to configure your intervention. The only mandatory field is to have a main operator selected. The other fields enable you to gather more information about your intervention. 

For now, I suggest you select as the main operator the one you just created in bAdmin, no need for co-operator, nor helpers. For the vehicle field, you can pick the vehicle you previously created. The same goes for equipment. In activities, you can see that we generated a few activities for you. You can tick every single activity and press "SAVE".

Your intervention is now fully configured. Let's start!

Configure your intervention in bMoves app
bMoves app - Intervention configuration

4. Starting your intervention

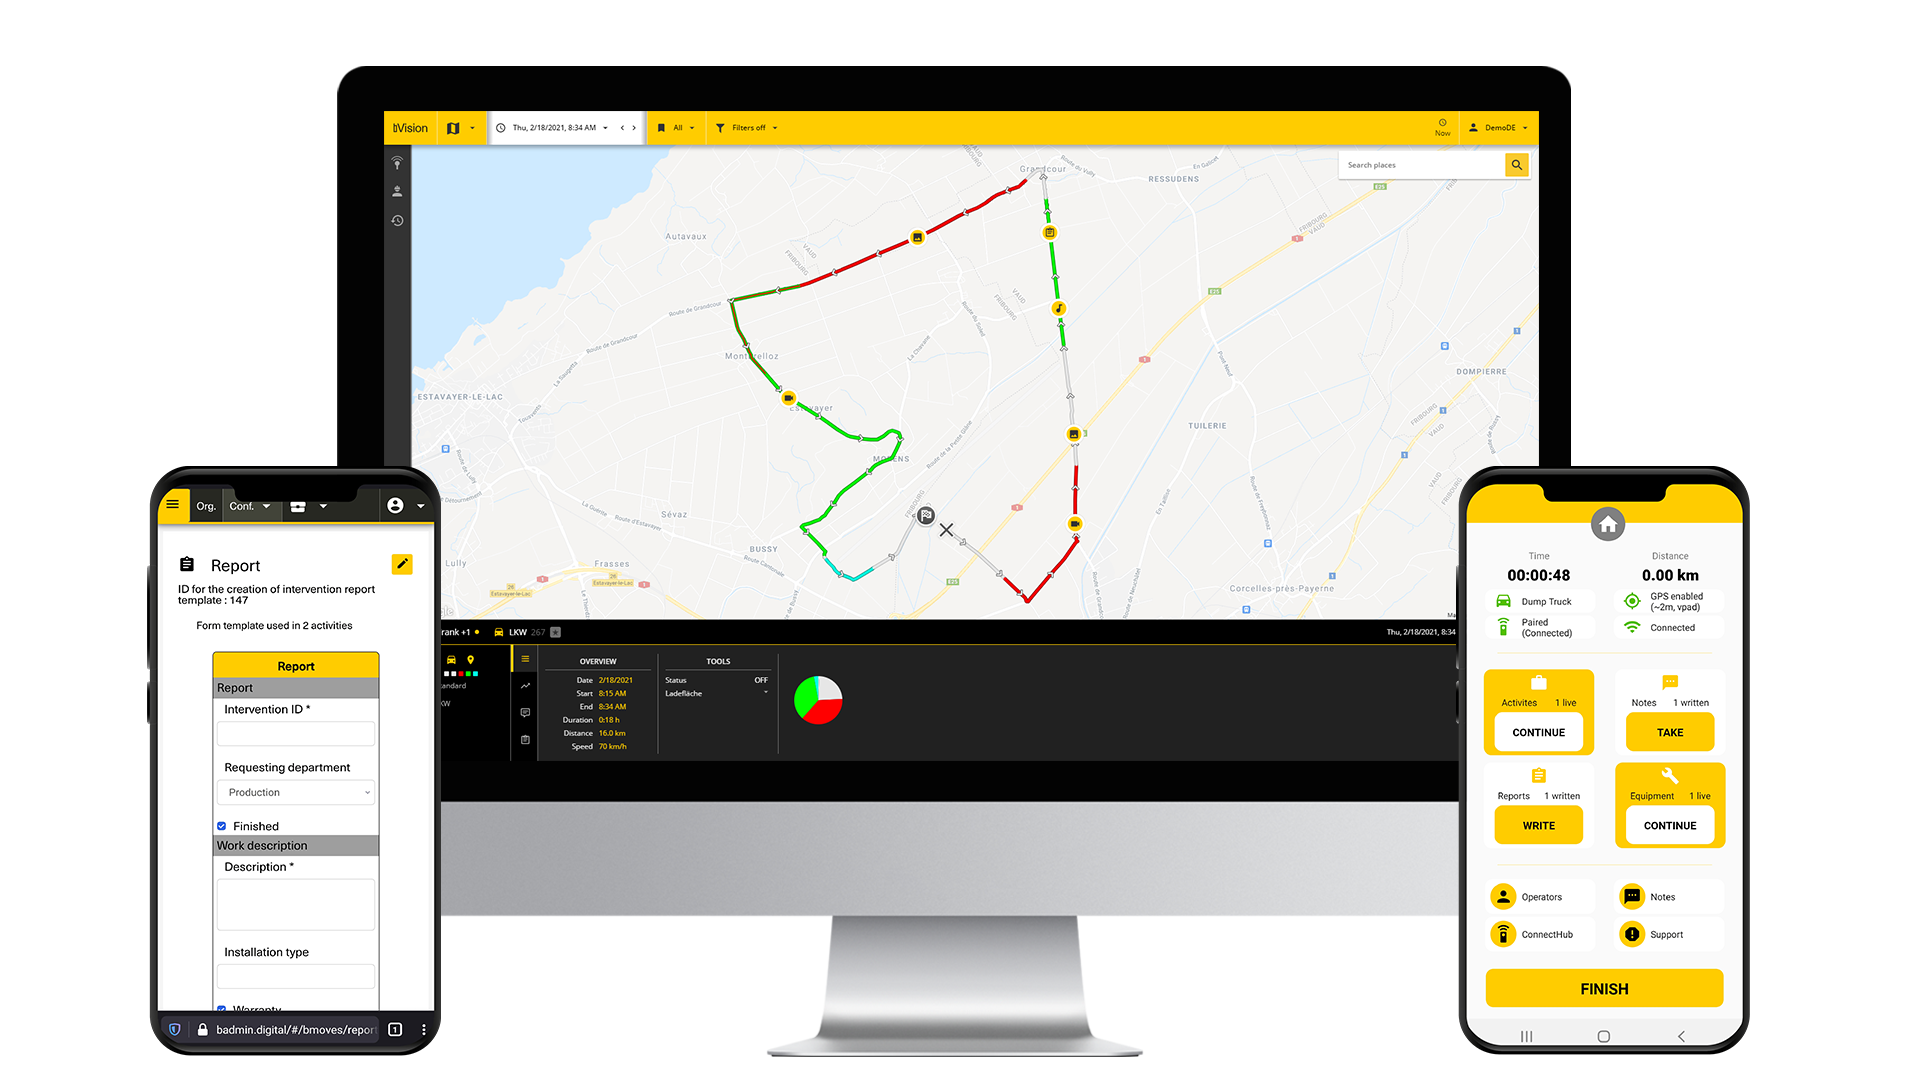
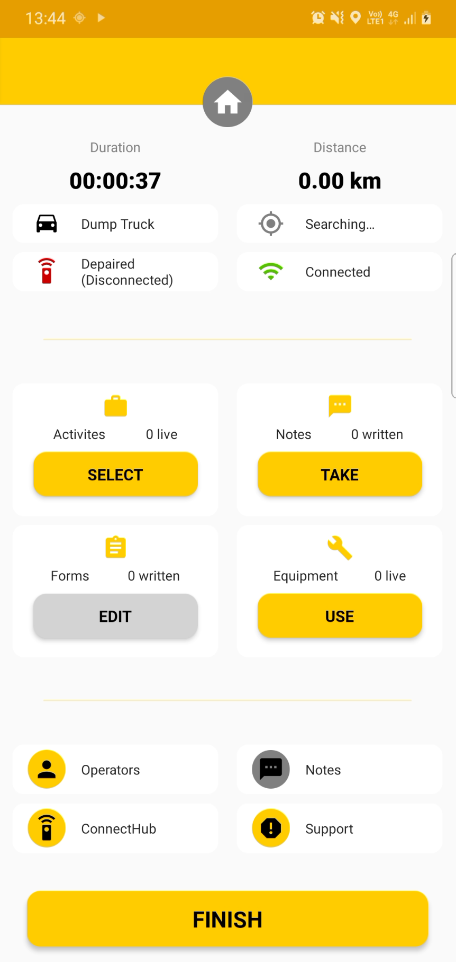
You can now press the yellow "START" button. This leads you to the central point of the intervention, the dashboard of bMoves app. From there, you can take notes, start activities, etc. bMoves app records everything you do until you press the yellow "FINISH" button on the bottom of your dashboard. If you go out of the app, the intervention will continue as you will see a notification advising you that you are still in an ongoing intervention. 

The dashboard features three sections. The first third of your screen is for information about the duration, distance, and connection to the mobile network, location, and vehicles. The second third is what you can do with the app like starting activities, taking notes, or using the equipment. The last third is information about your operators, the notes you took, ConnectHub, and access to support.

The first thing you can do is launch an activity. To do this, press on the yellow "SELECT" button below activities. In this list, you have several different activities. Activities with a yellow "START" button are exclusive others can be done in parallel. For example, you can run an activity with an option and a normal one at the same time. If you have a punctual activity, it will automatically get turned off since they are done only at a specific location and time.

The second element is notes. You can take several types of notes, including text, pictures, videos, or audio. Add a note by clicking on the yellow button "TAKE". You can then enter a text in the first field on the top of your screen. I would suggest then taking a picture. bMoves will automatically compress your files for easier sharing.  After which, you can click on the save icon in the bottom right corner of your screen. 

If you also have an equipment setup, you can click on the yellow button "USE" to open all your equipment. By default, your equipment is in manual. That means you can manually change their value. However, if you are connected to a vehicle with a ConnectHub, those data will automatically come from your vehicle. 

There is a lot of other things you can do with bMoves app such as filling forms. But for now, let's keep this intervention running and move to the visualization.

bMoves app - Dashboard

5. Intervention visualization

With your intervention still running on your phone, let's move to the visualization part, with bVision for computers and RWIS for smartphones (available for iOS and Android). In bVision, you can view every live intervention by clicking on the person icon in the left navigation menu. This list every ongoing intervention within your organization. If you did not stop your intervention on your phone, you should see your intervention in this list. When you click on the intervention, it will open a detail panel at the bottom of your screen as well as display the path of the intervention on the map. 

On the map, you can analyze the path taken during the intervention. On it, you can find every localized information such as notes, forms, etc. You can also see the color of the path that marks the activities done at a given place. Light grey means no activities are carried out, while other colors depend on the color you chose for this category. 

In the detail panel, you can see all the information about the intervention in a detailed summary. Using the navigation element in the left part of the detail panel, you can switch between a data view that gives the overview of the intervention and information about the live status of your equipment. If you click on the second element, you are on a graphical view of your intervention, for a detailed analysis of the intervention. And if you hover the graph, you can see the precise situation at any given point of the graph.

You can also visualize intervention in the past by clicking on the clock icon in the left navigation bar. This screen enables you to search for past interventions and then visualize them directly on the map as you would for a live intervention.

You can visualize your live intervention also in our app, RWIS. After you signed in with your credentials in the application, you land on the map. In this map, you can view every intervention currently active and located. Click on an arrowhead to get more information about the intervention such as the driven path. Secondly, on the bMoves screen, you can see the list of all live and near past interventions by clicking on the bMoves menu element.

There is a lot of insights you can gain from bVision, check our dedicated course to learn more about bVision.

Display your live intervention on the map

6. Generate reports

Before continuing with reports, you need to finish your intervention. Indeed, you can only generate reports for finished interventions.

The last section of this course is reporting. With the bMoves solution, you can export two types of reports. First, single intervention reports are used to export data about one single intervention. Secondly, multiple intervention reports are used to aggregate data from several interventions and export them in one report. The reporting feature is available in bVision by clicking on the map icon in the upper left corner and then selecting the menu element reports. 

To generate a report, first, select the time range. If you are doing a single intervention report, it's to search for the intervention. Otherwise, interventions in this time range are aggregated in one report. Secondly, select the report type (tour report for single intervention report and summary report for multiple intervention reports). Next is the branch, in your case, you should have only one element to select. You can then click on the yellow button "Search".   

Below, you find the result of your search. Aggregated in case of a multiple interventions report and by intervention in case of a single intervention report. Select all elements that you want to integrate into your report. Then just click on the yellow button "Create reports" in the bottom right corner of your screen. To generate a report in bMoves, you need a report template. By default, you have two templates built-in. But you can create and download your own.

To download your report, click on the yellow button "Create". That was a simple example of what you can do with our reporting features. You can learn more in our dedicated course.  

We now reached the end of this course to help you get started with the bMoves solution and you are now all set to keep using it and improve what you can do with it. Check our other courses to learn more about bMoves.

Open the reporting tool
Select the time range
Select the type of report
Select the needed interventions and generate the reports
bVision - Generate reports