bMoves app is our native mobile app for to track, geo-localized and document everything you do on the field. This course walk you through everything you need to know to use bMoves app as a pro.
Before starting this course, please make sure that you have bMoves app installed on your phone. You can download bMoves for iOS and Android.
1. Sign in bMoves app
You have bMoves on your phone? Great. Now you open the app. The first time you open the app, you will land on a sign in page. If you are using bMoves by request of your organization, your administrator will provide your credentials. Otherwise, you can create a free account directly within the app by clicking on the yellow register button.
Once you have your username and password, you can directly fill the username and password and press sign-in. If you have a custom domain such as xyz.borrma.info, click the checkbox at the bottom of the screen and enter your platform name, your username and password then click on sign-in.
2. Manage your settings
bMoves is an app that tracks your location, the activities you do, the forms you fill, the notes you take and the equipment you use. However, bMoves track you only during an intervention that you manually start. Before an intervention, you can use the Settings to change what will be tracked and how the tracking is done.
To open the Settings, open the menu by clicking on the burger menu icon in the upper left corner. Then click on Settings. In the Settings, you have several options to tailor your experience.
- Manual data reloading : Click on the "RELOAD" button to manually reload your bMoves data. This will reload the operators, activities, vehicles and equipment that you can select when you start an intervention.
- Automatic data reloading : Enable this to automatically reload your bMoves data. If this is disabled, you will have to press the "RELOAD" button when a modification to your operators, activities, vehicles and equipment is made. Unless you have hundreds of activities, we recommend living this setting enabled.
- Device geo-positionning : When enabled, bMoves will automatically get your location and store it. This allow you to geo-locate everything you do during an intervention such as your activities, equipment usage and notes. If you choose to disable this setting, bMoves will never geo-locate you.
- Data transmission method : This setting change the method used to send the data of your interventions. If you leave this setting to "live", bMoves will continuously send what you do during your intervention over the mobile network. This setting, enable a live monitoring of the situation through bVision and RWIS app. When the field is disabled and set to "Manually, at the end", you will have to send data of your intervention yourself. See point 10. Finishing an intervention of this course for more information about this.
- ConnectHub : The ConnectHub setting enable you to pair your bMoves app with a ConnectHub or ConnectHub GEO installed in a vehicle to automatically get data about your vehicle during the intervention. To connect your app to a ConnectHub or ConnectHub GEO, press the "SCAN" button and then press the "CONNECT" button next to the ConnectHub or ConnectHub GEO you want to connect. You can also connect to a ConnectHub or ConnectHub GEO during the intervention.
3. Configure an intervention
On the Start page (available in the burger menu), you can configure your intervention. There is several things you can configure before each intervention. Changing this configuration, enable you to provide more context and information regarding your intervention.
- Main operator : The main operator is the person in charge of the intervention. It's the only mandatory field.
- Co operator : The co operator is the another person active during this intervention. Usually, this field is used for the person who seconds the main operator.
- Helpers : Helpers are people who participate in an intervention to provide help.
- Vehicle : Select the vehicle you are using for this intervention. If you do not select any vehicle, bMoves will consider that you are doing this intervention on foot.
- Equipment : Select the equipment you will be using during this intervention. Equipment can either be automatic equipment connected to a ConnectHub or ConnectHub GEO, as well as manual equipment where you will change the value yourself.
- Activities : Select the activities you will be carrying during this intervention. You can always change this later.
When you configured all fields according to the intervention you are about to carry. Press the yellow "START" button on top of your screen. As soon as you press this button, everything you do is tracked. If you are in live data transmission method, everything is automatically send to our servers for a live analysis on our visualization tools.
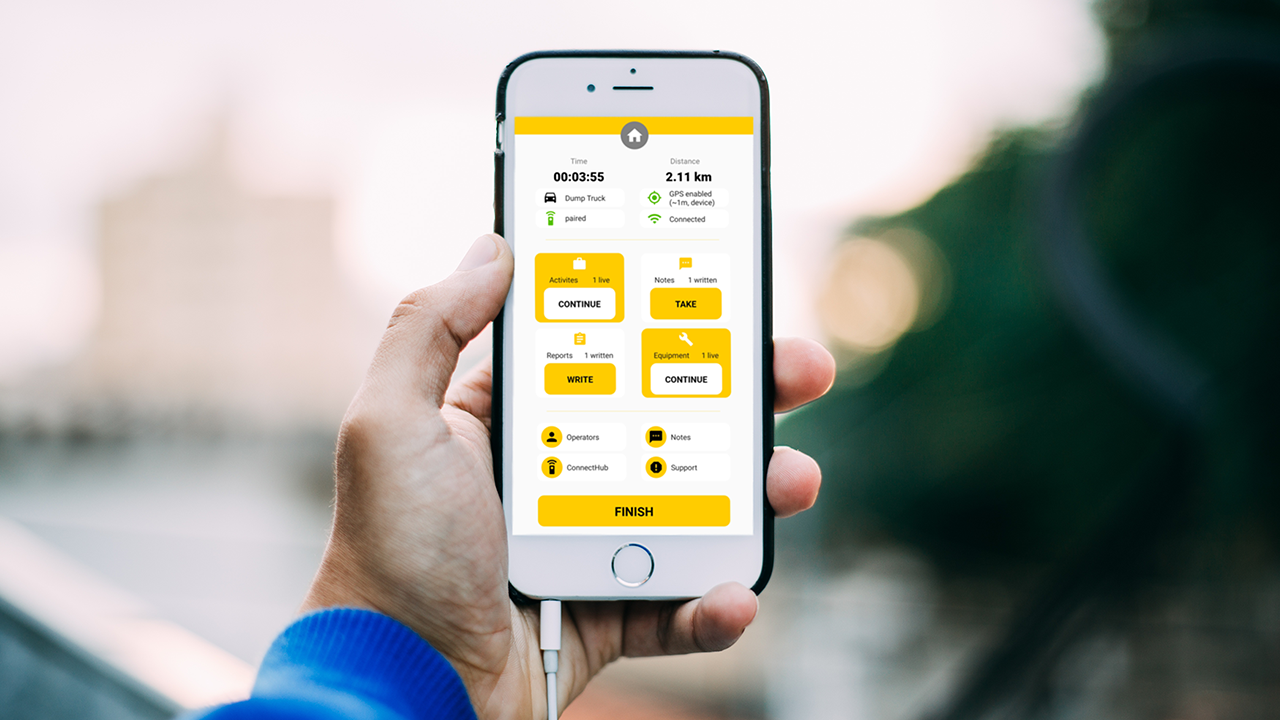
4. During an intervention - the Dashboard
Once you have started an intervention, you land on the Dashboard. This dashboard centralize every information about the current intervention and everything you can do. The dashboard is divided into three parts, information on top, actions in the middle and helps in the bottom.
Information
The information on top provide you with the duration of the current intervention and the distance travelled on the first line. If you geo-positionning is disabled, the distance will stay at 0.00 km even if you are moving. The second line features the vehicle you selected for this intervention and the status of your geo-positionning. The geo-positionning can feature several statuses. "Searching..." informs you that you are currently not located while your setting is set to locate you and your phone is searching for geo-positionning signal. "GPS enabled" informs you that you are currently located, with your precision below. "GPS disabled" informs you that your geo-positionning is disabled for this intervention. The last line informs you if a ConnectHub or ConnectHub GEO is currently connected with bMoves app and if you are connected to the mobile network. If the left icon is red, it means that your are currently not connected. If the icon is black, it means the feature is disabled in your settings.
Actions
In the middle of your screen, you have four type of actions. Activities, Forms, Notes and Equipment. For more information about activities, please go to section 5. During an intervention - Activities of this course. For more information about forms, please go to section 6. During an intervention - Forms of this course. For more information about notes, please go to section 7. During an intervention - Notes of this course. For more information about equipment, please go to section 8. During an intervention - Equipment of this course.
Helps
Finally, you can find four buttons to help you in the bottom of your screen. First, "Operators" lets you review which main operators, co operator and helpers you selected for this intervention. "Notes" enables you to review and edit the notes previously taken during this intervention. "ConnectHub" enables you to connect to a ConnectHub or ConnectHub GEO. Just press on the "SCAN" button and then on the "CONNECT" button for the ConnectHub or ConnectHub GEO you want. "Support" enables you to get help from other users and our product specialists on our Community Support.
To finish an intervention and stop being tracked, click on the yellow "FINISH" button at the bottom of your Dashboard.
5. During an intervention - Activities
Activities are things you do during an intervention. For example, driving, repairing a pipe or cutting a tree are all examples of activities. Activities are customized by administrators for one intervention. In bMoves app, you can document the activities you are doing by clicking a few buttons.
To start an activity, click on the "SELECT" button from the dashboard. This will open the "Activities" screen. On this screen you will see every activities you have selected before your intervention. You can change your selection of activities at any time by clicking the yellow "+" button in the upper right corner. Then tick the checkbox of all activities you want accessible.
There is several types of activities you can have on this screen :
- Exclusive activities are activities during which you cannot do anything else. Exclusive activities are marked by a yellow "START" button. Click on this button to start doing the activity. Once you are finished with this activity, click on the "FINISH" button on the bottom of your screen.
- Toggle activities are activities that you can start by enabling the toggle element. Just press on the toggle element to start it. When the toggle is yellow, it marks that the activity is currently active. Those activities are always non-exclusive.
- Options activities are activites with several possibilities. Options are displayed as icons with a text next to it. For example, an activity "Repairs" can have options such as "Repairing pipe" or "Repairing valve". To enable an option, click on the icon of the option you want. When an icon is yellow, it means that this option is currently enabled.
- Punctual activities are activities that only happens at one precise time. Punctual activities can be in the form of a toggle, exclusive or options activities. When you start it, it will automatically revert back to it's off stage.
Some activities contains forms that you have to fill, please read section 6. During an intervention - Forms of this course for more information.
6. During an intervention - Forms
A form is integrated to an activity. It enabled you to provide more information about an activity by filling input texts, checkbox, select or other form elements. The field with a * after their name are mandatory. You will not be able to save the form until you filled them.
As soon as you filled all mandatory fields, you can press the yellow "Finish" button to send the form. Make sure to fill every field you need before pressing the "Finish" button. You can change the form at any time during the intervention. To do this, go on the Dashboard of bMoves and click on the "EDIT" yellow button in the middle of your screen. In this "Forms" tab, you can see every forms you filled during this intervention. Click on the form you want to edit. This will open the form and allow you to edit each fields. Once your modification are done, click on the yellow "Save" button in the bottom of your screen.
Forms are custom built by administrators for their own organization. So if you have any question regarding the form, make sure to contact your platform administrator.
7. During an intervention - Notes
During an intervention you can take notes. Notes can be of several types, a simple text, a image, a video or an audio. To take a note, just click on the yellow "TAKE" button in the actions section of the Dashboard. In the "Notes" tab, you can first enter a text with the "Insert a Note" input on top of your screen. You can insert a text also with image, video or audio notes but it's not mandatory.
- To add an image, you can click on "Library" to get a picture from your phone's library or "Camera" to directly take a picture with your camera.
- To add a video, you can click on "Library" to get a video from your phone's library or "Camera" to directly shoot a video with your camera.
- To add an audio, you can click on "Library" to get an audio from your phone's library or "Microphone" to directly record an audio with your microphone.
When your note is ready, click on the yellow save icon in the bottom right corner of your screen. You can edit a note recorded during the intervention by clicking on "Notes" in the Help section of the Dashboard. Then click on the note you want to edit.
8. During an intervention - Equipment
During an intervention, you can use equipment. There is two types of equipment, manual equipment or ConnectHub equipment. A manual equipment is an equipment for which you can manually change the value. A ConnectHub equipment is an equipment for which the value are automatically provided by a ConnectHub or ConnectHub GEO. ConnectHub equipment are only available when your bMoves app is wirelessly connected to a ConnectHub or ConnectHub GEO.
An equipment can have several type of measurement. A measurementis an element of an equipment for which you measure the value. For example, you want to measure if your mower is on or off. For manual equipment, you can change those values yourself. There is several types of measurement, toggles, numeric and select.
- To enable a toggle measurement, you only have to click on the equipment you want and then click on the toggle of the measurementyou want to change.
- A numeric measurementfeatures a number and +, - buttons. You can increase the value of the number by clicking on the yellow + button and decrease with the yellow - button. The limits of this value and the steps by which you increment or decrement it are configured by your administrators
- A select offers you the possibility to select a value in a list. Just click on the select element and then click on the value you want to select.
Your equipment will be marked as ON when the proper measurement, as defined by your administrators, are active or follow certain rules. Equipment are manually configured by your administrators, so make sure to contact them if you have any questions.
9. During an intervention - ConnectHub
ConnectHub or ConnectHub GEO are hardware devices installed in your vehicule to get data of you vehicle and the usage of its equipment. A ConnectHub or ConnectHub GEO is installed in your vehicle. Check our course to learn how to install a ConnectHub or ConnectHub GEO.
- Connect to a ConnectHub or ConnectHub GEO : Before an intervention, you can connect by going in the Settings page and press the yellow "SCAN" button. Then press on the yellow "Connect" button for the hardware you need. During an intervention, you can connect by clicking on the ConnectHub button of your Dashboard. Then press the yellow button "SCAN" and press "Connect" on the hardware you need.
During an intervention, if you are connected to a ConnectHub or ConnectHub GEO, the information tile below the name of your vehicle will turn green and inform you that you are paired.
You can check the data coming from your ConnectHub or ConnectHub GEO by click on the yellow "USE" button under Equipment in the action section of your Dashboard. In the Equipment page, you can see that the ConnectHub or ConnectHub GEO is connected if the car icon next to the name of your vehicle is green. If this icon is red, it means you are not connected. The data of your vehicle are displayed in the ConnectHub section. You can also check those data directly in the menu of your ConnectHub or ConnectHub GEO.
10. Finishing an intervention
When you are done and do not want to be tracked anymore, you can finish the intervention. To do so, press the yellow "FINISH" button in the bottom of your Dashboard. Keep in mind that you cannot edit your intervention after you finish it.
If you are in manual data transmission method, you have to manually send the intervention. After the intervention and when you have mobile network or WiFi, open the menu by clicking the burger icon in the upper left corner and click on "Data". All unsent interventions appear in the bottom of your screen. Use the select all checkbox to select all unsent interventions, then click on the yellow send button (the triangle pointed on the right). If your interventions were very long, this might some time. A soon as your interventions are sent, you can visualize them on our tools.