Getting Started with bAdmin
bAdmin is our administration tool for your bMoves. In short, this is where you tailor bMoves to your use. You can completely configure bMoves to your needs. Configuring bMoves will enable you to control what your team can record on the field, which activities they perform and what form they fill.
You can access bAdmin on https://badmin.digital/
If you don't have an account, you can create one for free now.
1. Dashboard
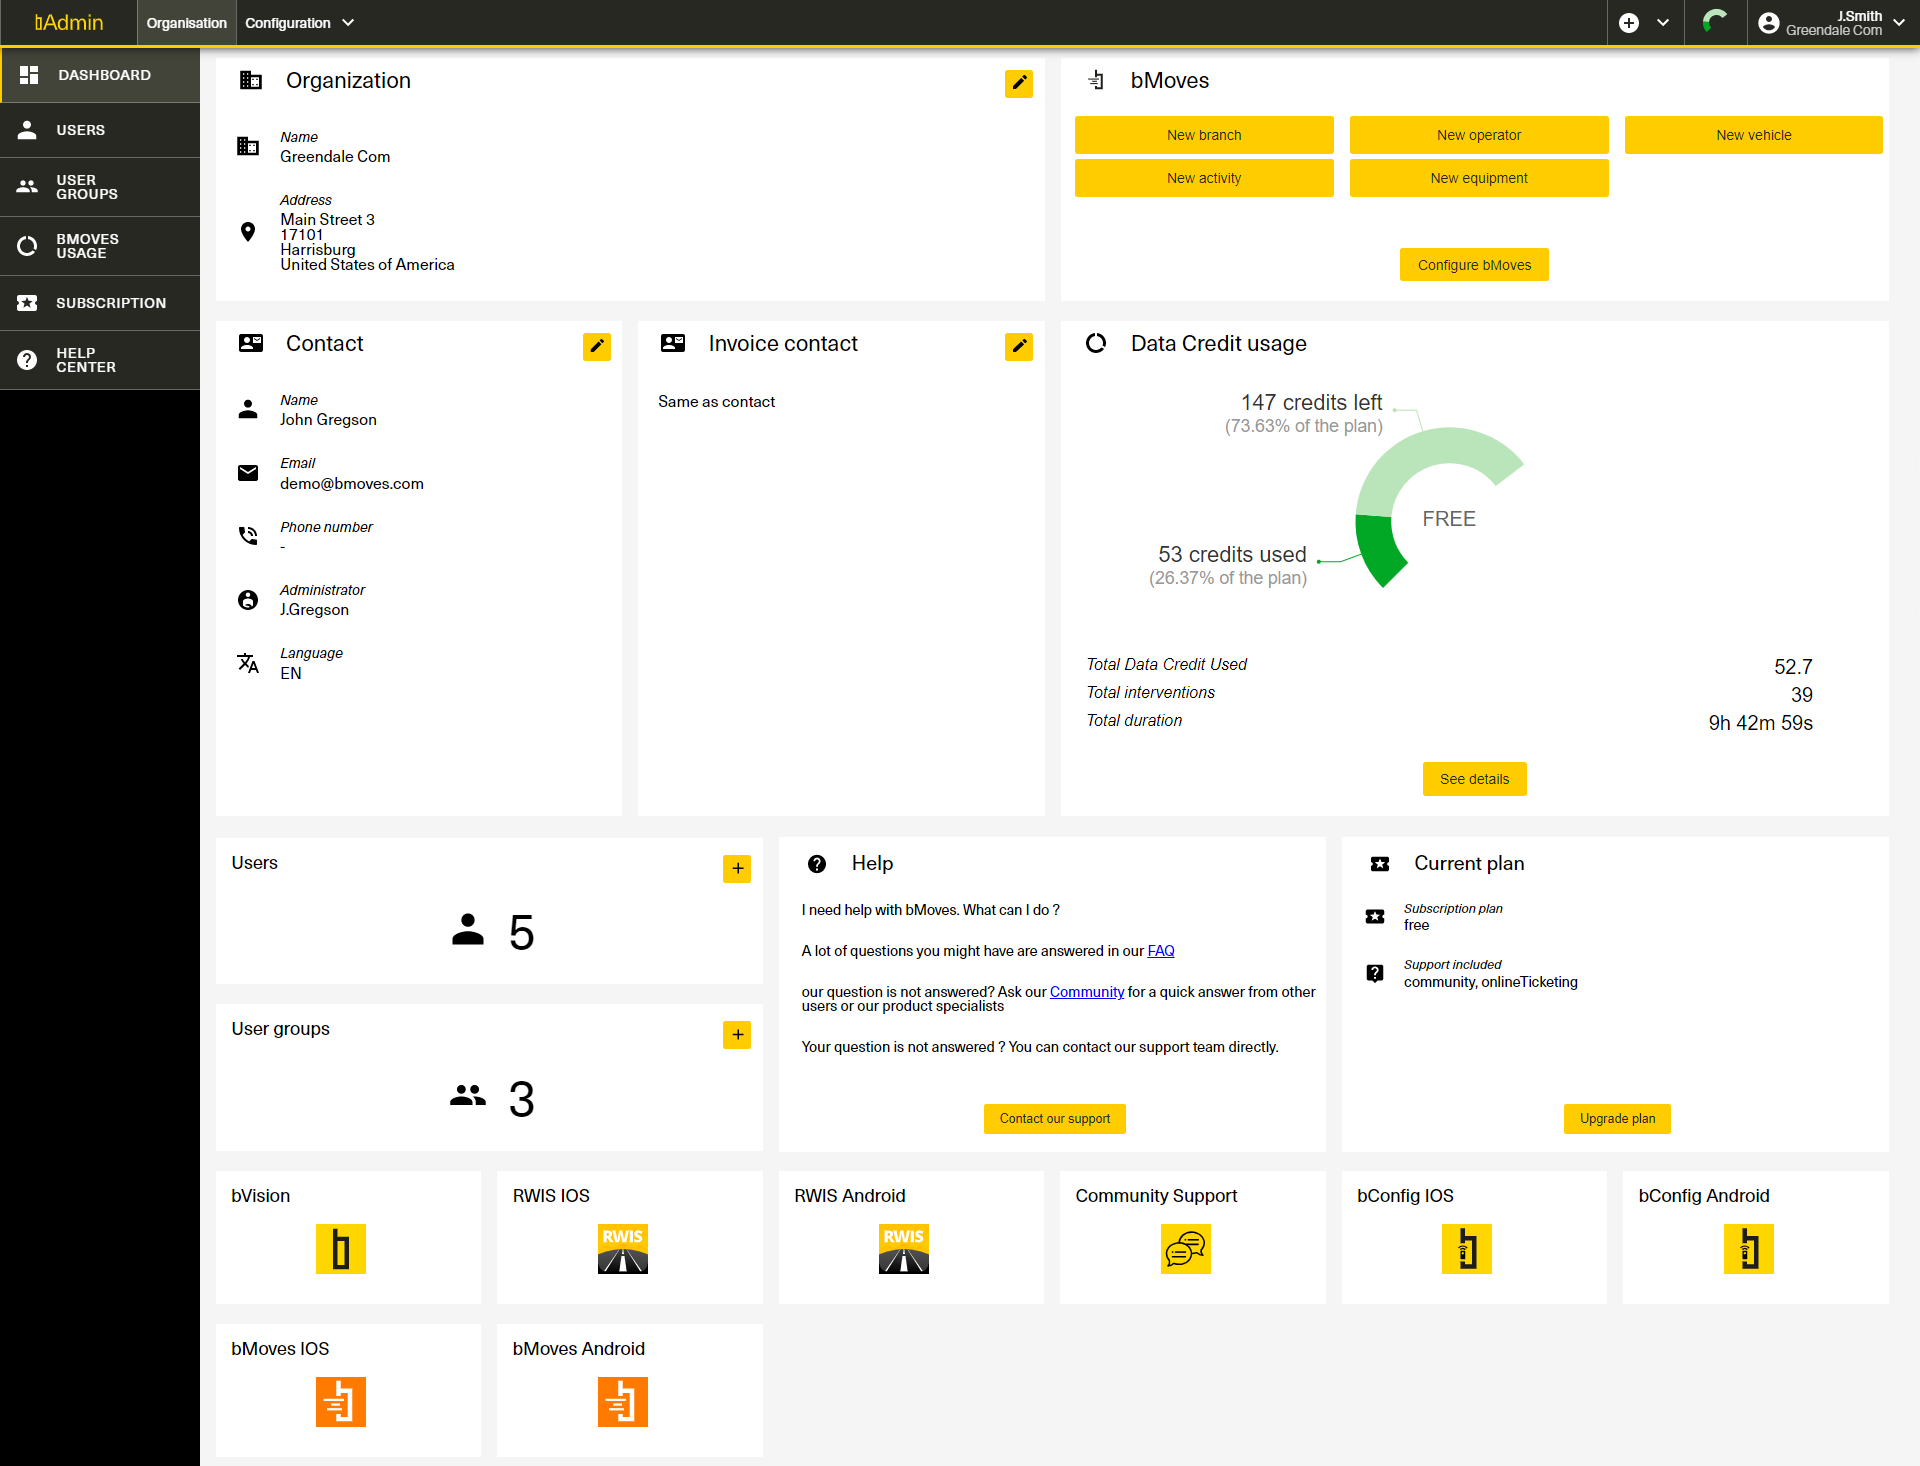
The dashboard is the center of bAdmin where you can access everything from bAdmin as well as the other tools of the solution. The dashboard features tiles displaying a information and useful link to you.
- Organization : Display the name and address of your organization, as well as your tax number if you provided one. Be carefull, if you don't provide a tax number or don't have one, we might have to charge you taxes.
- bMoves : This tile features quick access links to create bMoves data branches, operators, vehicles, activity, equipment and more.
- Contact : Our main contact within your organization. We will contact you, according to your settings, for technical or information purposes.
- Invoice contact : Our contact for invoicing of the subscription's fee. It can be the same as the main contact.
- Data credit usage : Keep an eye on your usage of bMoves with our gauge displaying the Data Credit you used and the one that is left
- Users : Show the number of users currently in the organisation. You can add one by clicking the "+" button.
- User groups : Show the number of user groups in your organization. You can add one by clicking the "+" button.
- Help : Provide you with a list of all the places you can use to get help. Check our FAQ, Community Support or open a ticket.
- Current plan : Outlines your current subscription of bMoves and the support you have access to. Upgrade your plan for more Data Credit and support.
- Useful links : Links to all of our tools and application. bVision, RWIS iOS, RWIS Android, Community Support, bConfig iOS, bConfig Android, bMoves app iOS, bMoves app Android
2. Organisation or Configuration
On top of your screen, next to the bAdmin logo, you have access to two menu tabs, organisation and configuration.
- Organization : This tab provides access to everything regarding your organization. For example, you can manage your users, user groups, bMoves usage, subscription and get help. Check section 10 to 13 of this course to learn more.
- Configuration : This tab enables you to configure all of your bMoves data. bMoves data are the data you will use during an intervention, such as operators, vehicles, equipment, activities, forms. It's also where you can upload your report templates. Check section 3 to 9 of these courses to learn more. Check our course about reporting to learn more about report templates.
Please note that when you delete a bMoves data, it will remain visualizable in bVision for as long as your historical availability defined in your subscription. However, you are not able to use it anymore in bMoves app or bConfig, nor edit it in bAdmin.
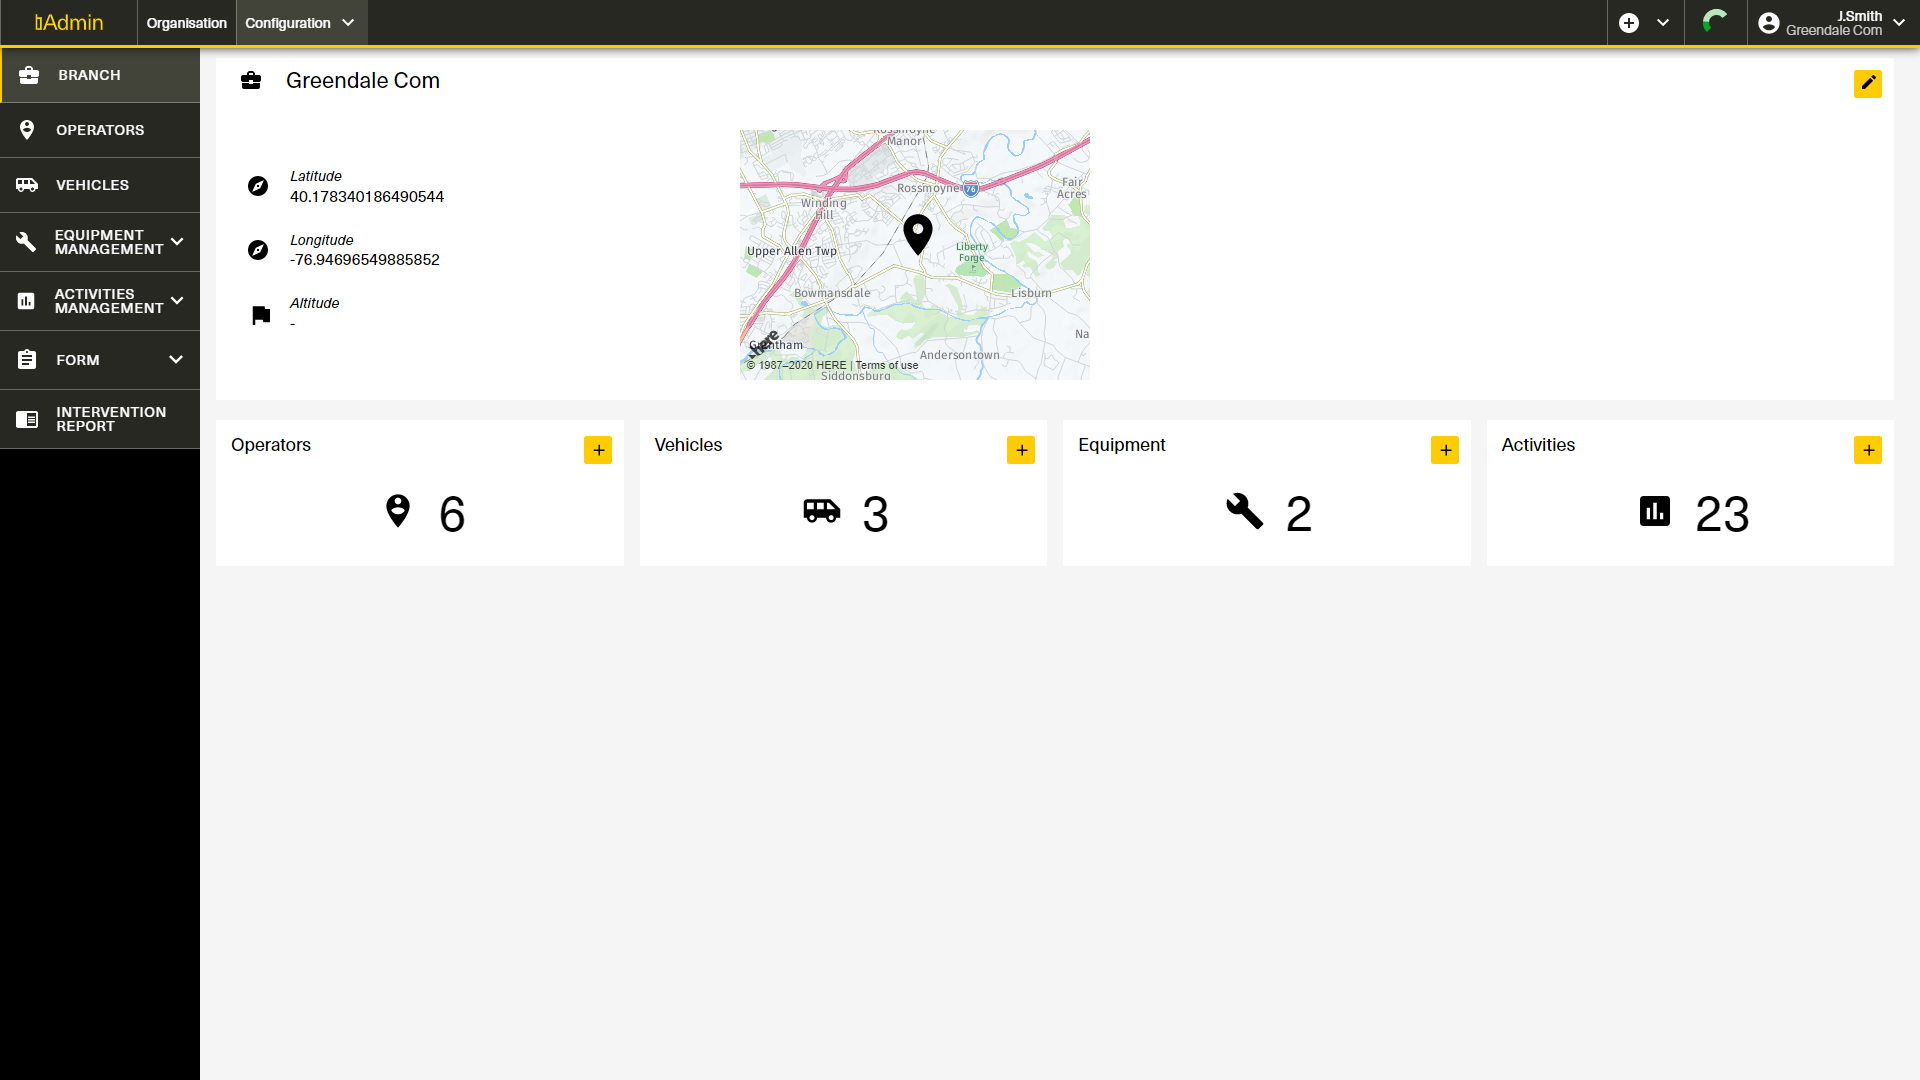
3. Branches
Branches are subdivision within your organization. They are used when your operations are separated between several geographical or administrative subdivision. They enable you to organize your operators, vehicles and equipment better. They also enable a quicker visualization of your interventions by enabling you to select interventions done by operators attached to a specific branch.
To delete a branch, click on the pen in the top right corner and then press on the red button "Delete". Be careful, if you delete your last branch your usage of bMoves will be strongly limited.
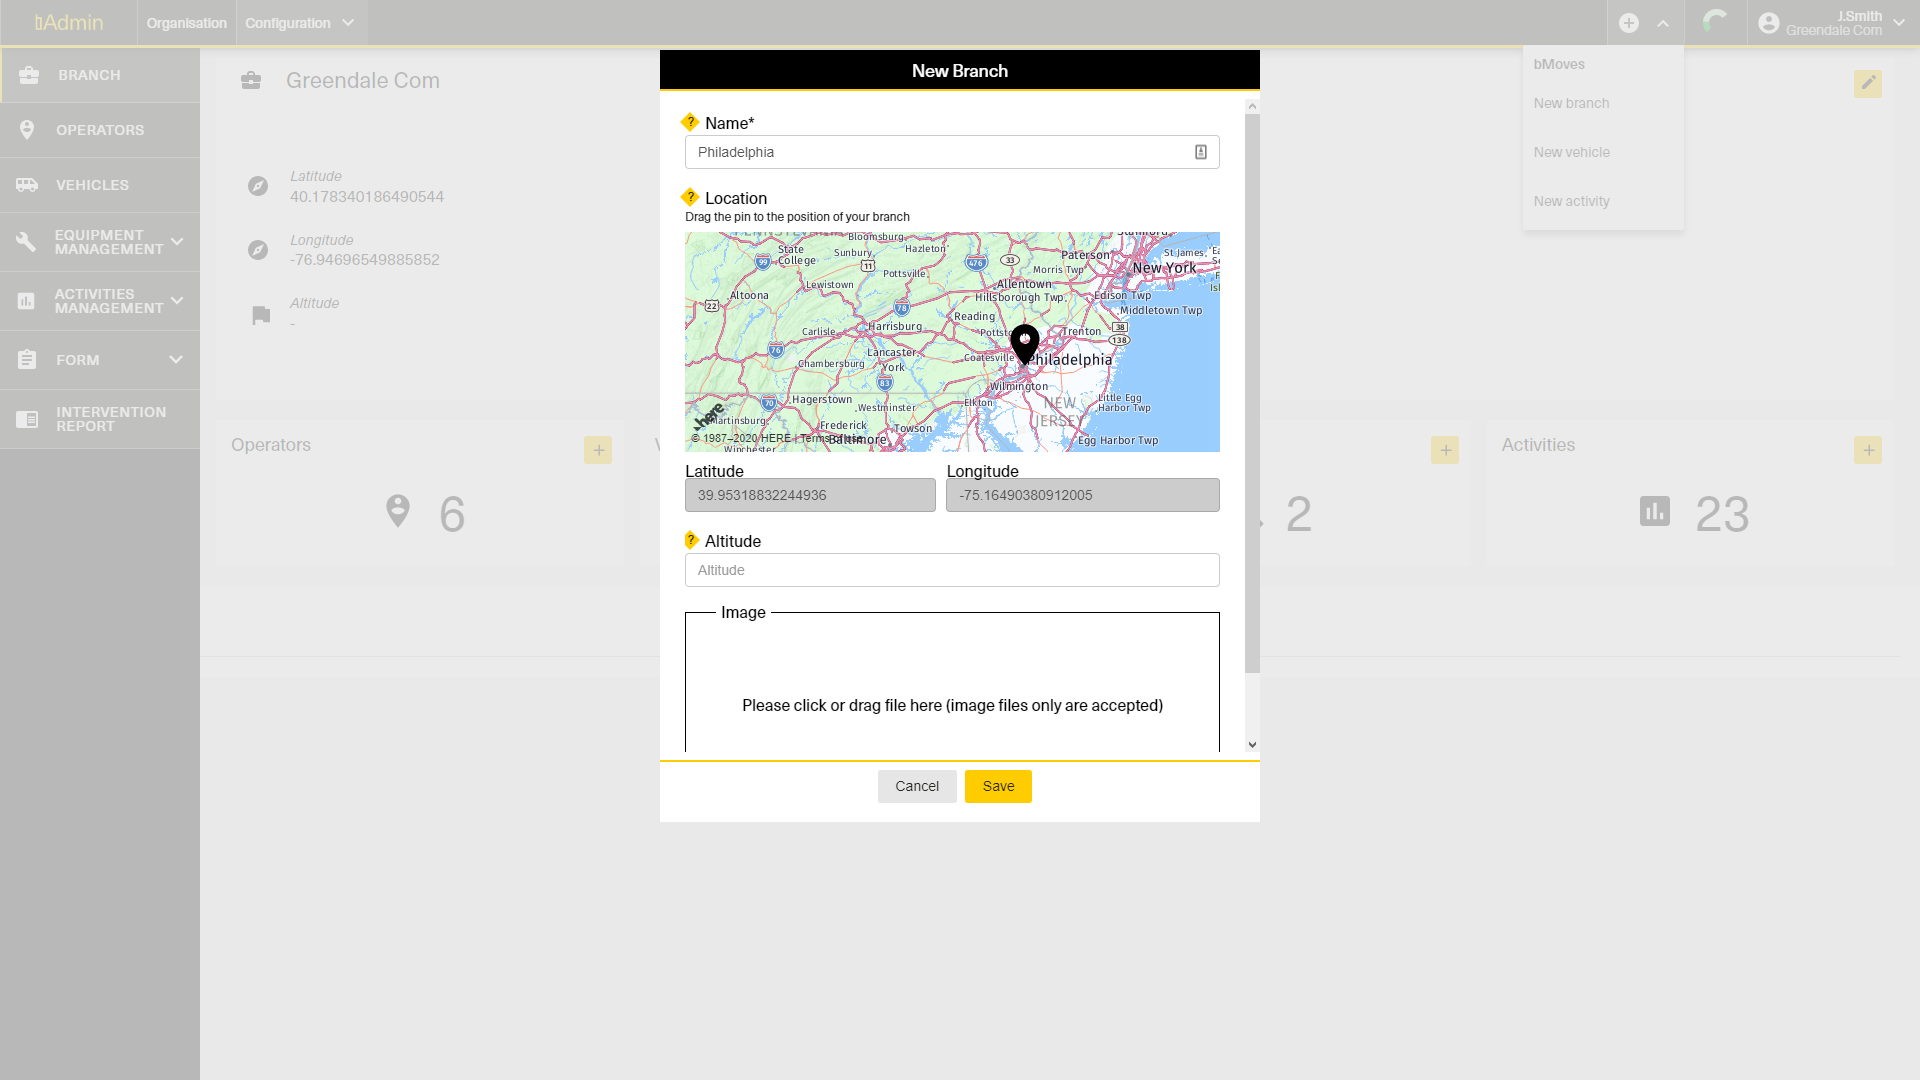
bMoves creates a default branch for you when you register. But you can create a new branch by clicking on the "+" icon in the upper menu (top right) and then selecting a new branch.
In the branch creator, the only mandatory field is the name of your branch. You should also change the location of your branch by dragging the pin on the map. This will enable our maps visualization to directly center on the approbriate branch.
You can also enter the altitude of the location of your branch as well as upload a picture of your branch.
If you have two or more branches, a branch selector appears on top of your screen, next to "Configuration".
4. Operators
Operators are the people who perform an intervention. 3 types of operators exist :
- Main operator : Main person responsible for the intervention
- Co operator : Operator working on the intervention in cooperation with the main operator
- Helper : Operator helping during an intervention.
An operator belongs to a branch. You have to select the correct branch to which the operator belongs to see him or her in the list.
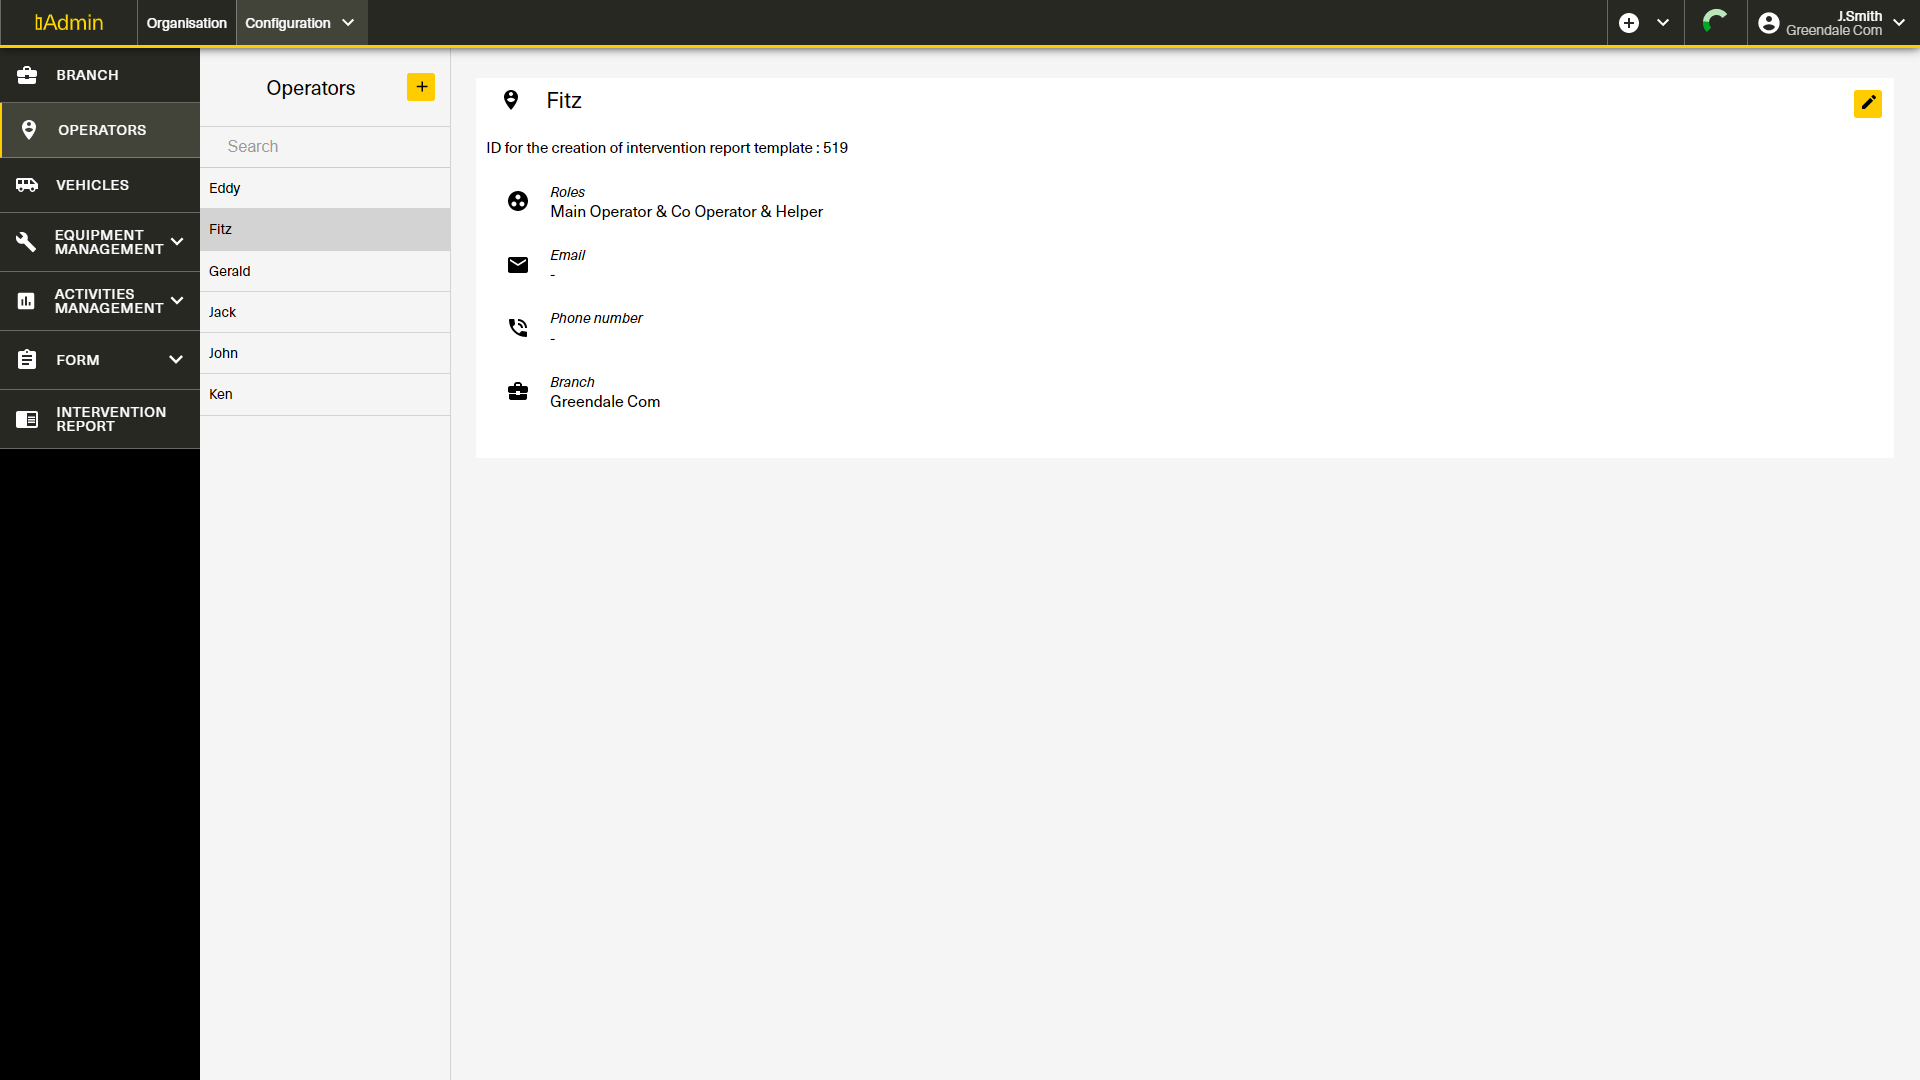
When you click on "Operator" on the left menu, you open the operator screen. This screen enables you to view every operator of the currently selected branch. Click on an operator in the list to open the summary. You can also use the search bar to search for a specific operator.
You can edit any operator by clicking on the pen in the top right corner. This will open the edition form where you can change information about the operator. Note that the phone and email are not editable because they are linked to the user.
You can also delete by clicking on the red "Delete" button in the top right corner.
Please note that the same process applies to edit or delete any bMoves data. Thus this course will not repeat the same information every time.
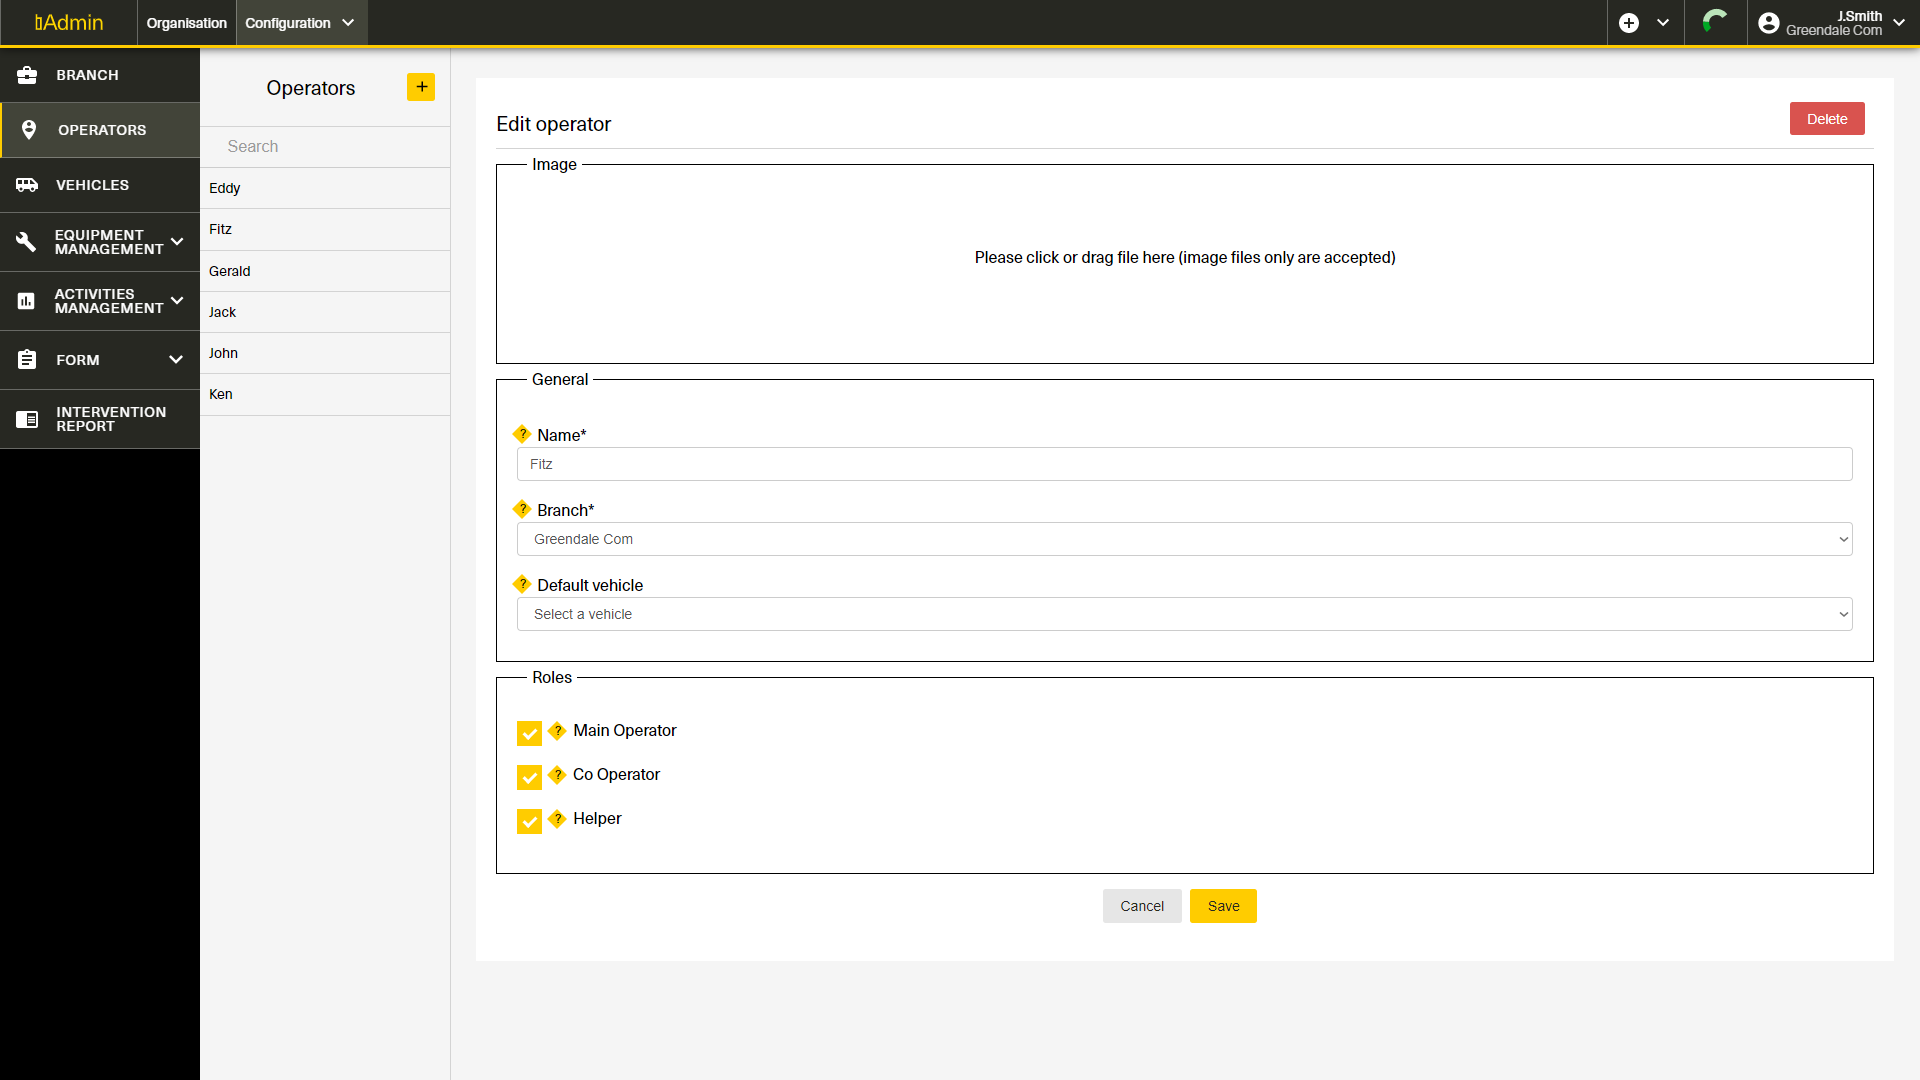
You can create a new operator by clicking on the "+" in the top of your screen, next to Operators". This will open the menu to create an operator.
When you create a new operator. You can enter information :
- Image : Upload a picture of the operator.
- Name : The name of your operator (Edward in the screenshot below)
- Branch : Select the branch to which this operator is attached
- Default vehicle : If this operator has a default vehicle, you can select it in the list.
- Roles : Select if this operator can be Main Operator, Co Operator or Helper
Finally, the checkbox "Also add as user" enables you to directly create a user for this operator.
5. Vehicles
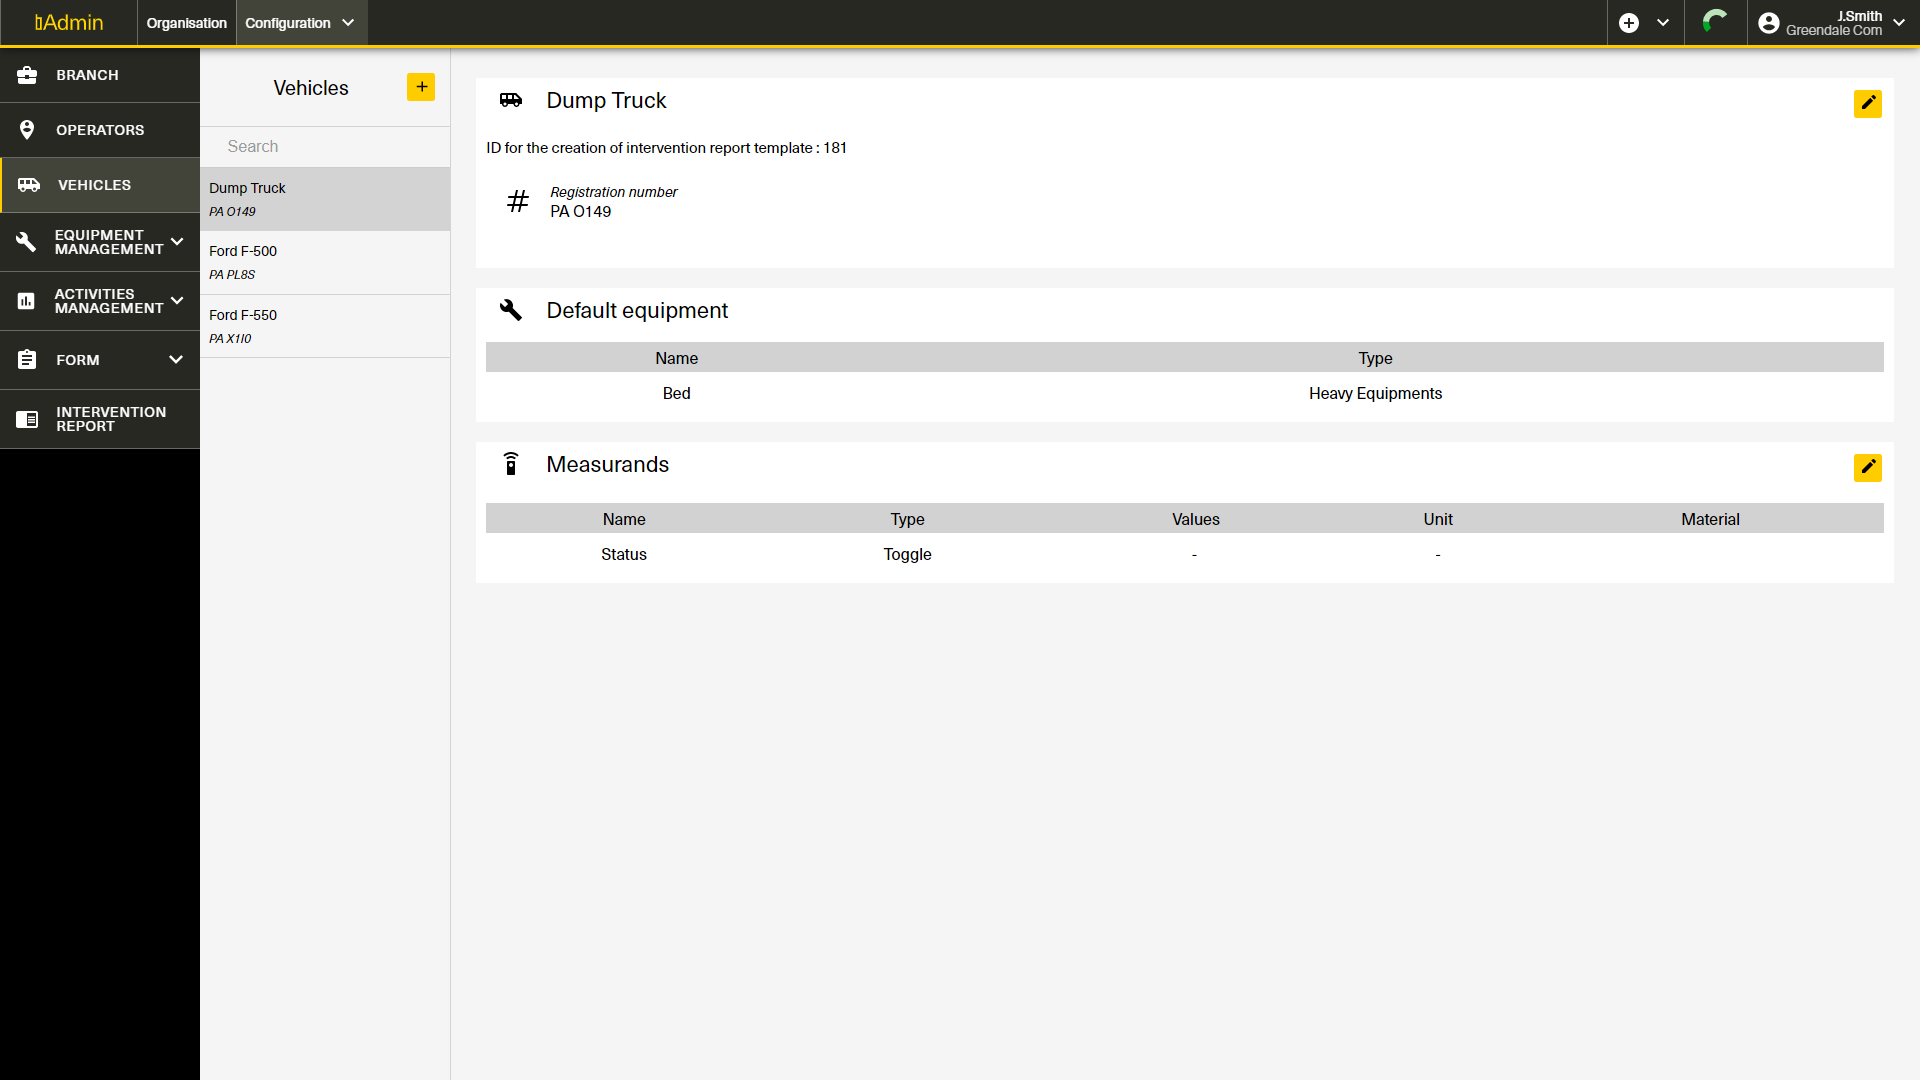
In bMoves, you can enter all your vehicles for usage in bMoves. An operator will be able to use the vehicles you enter in bAdmin. A vehicle has a name, registration number and belongs to a branch. A vehicle also can have default equipment mounted on it as well as direct measurement.
A measurement is something you measure in the usage of your equipment. For example, the speed of your vehicle, if your vehicle is on or off, your spraying quantity and much more.
You can add default equipment directly when creating the vehicule. For measurement, you can add them to the vehicle you want by clicking on the desired vehicle and then click on the "pen" icon on the "Measurements" tile. Using the select, you can then search for and click on measurement you want to add to this vehicle. Press "Save" when you are done.
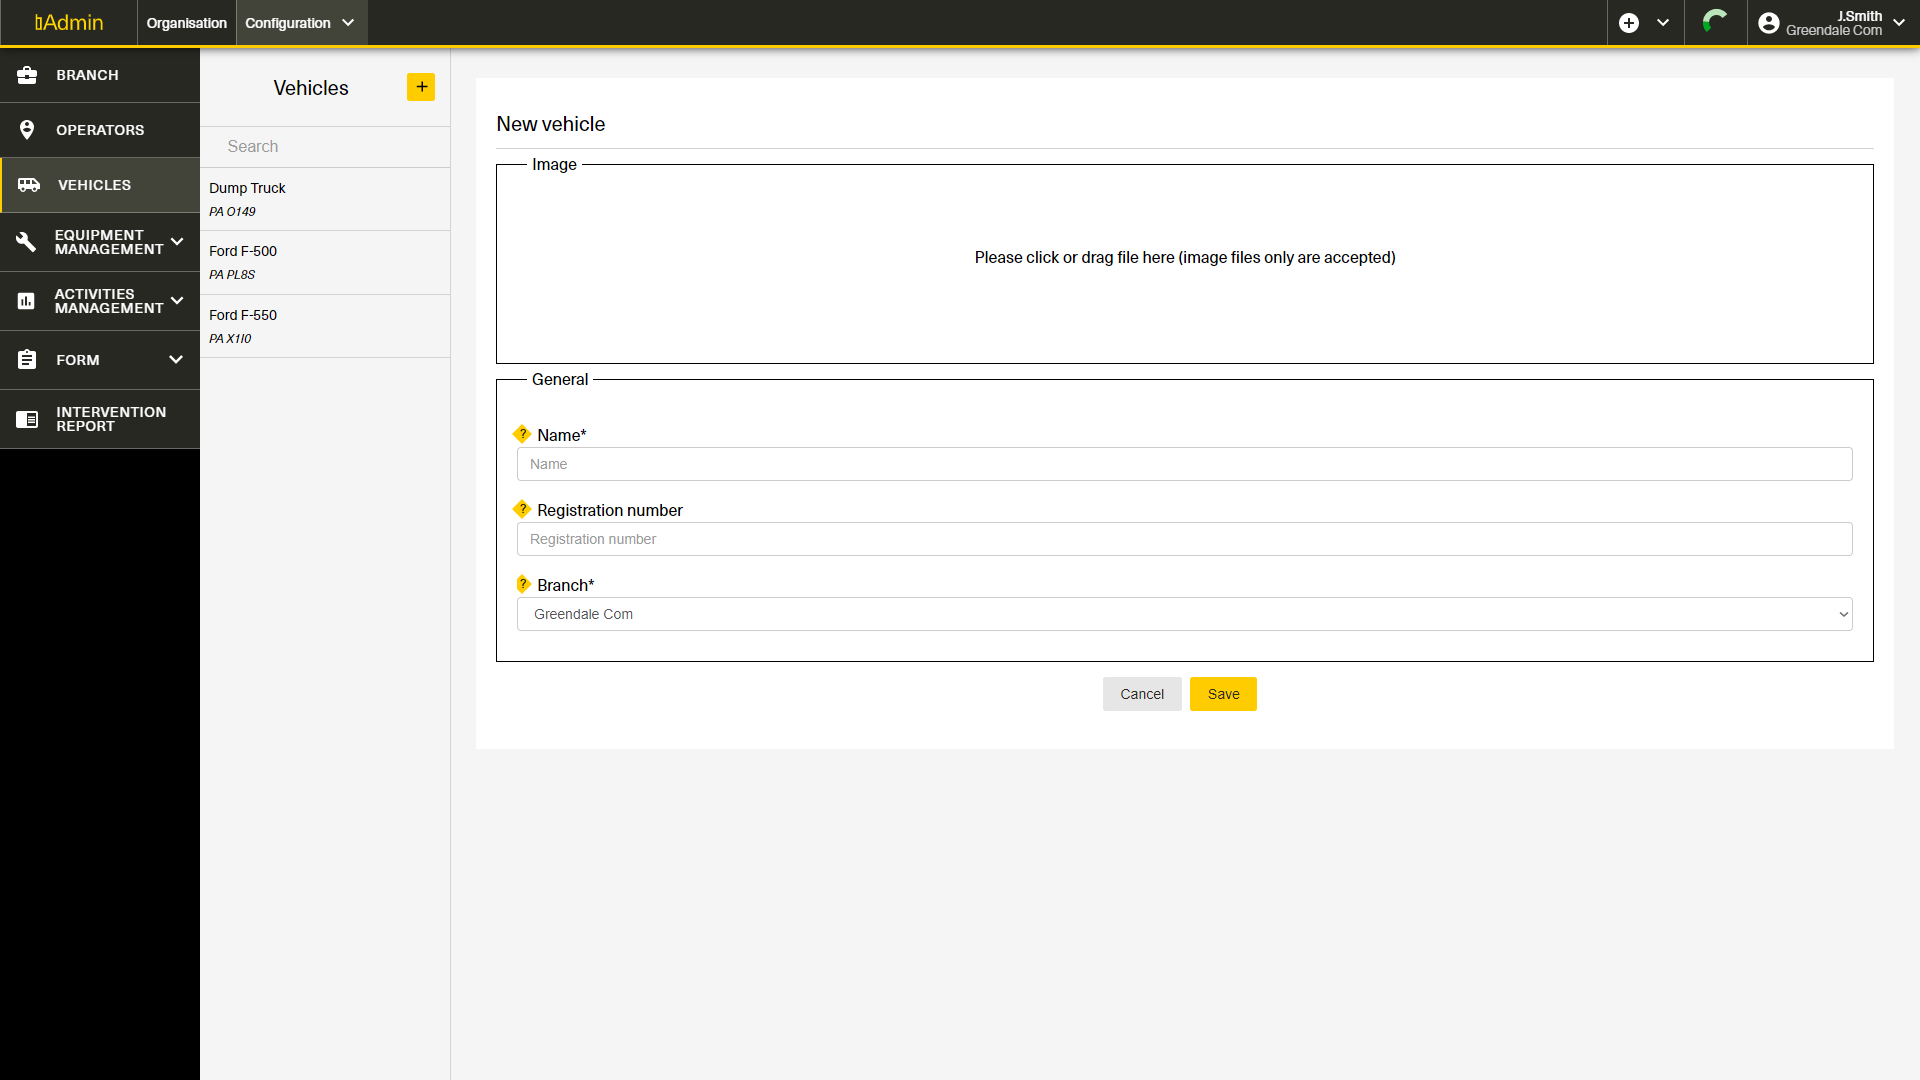
You can add a vehicle by clicking on the "+". Then you can enter an image of the vehicle, the name of the vehicle, the registration number and the branch to which it belongs.
Press "Save" when you are done. You can then add measurements to this vehicle.
6. Equipment
With bMoves you can create and configure your equipment. A equipment is something mounted on your vehicle or used by hand, such as a mower, a sprayer, an excavator,... To measure what the equipment is doing, you can attach measurements to it. If you have a ConnectHub or ConnectHub GEO, those data automatically come from your vehicle. Learn more about the ConnectHub or subscribe to ConnectHub directly.
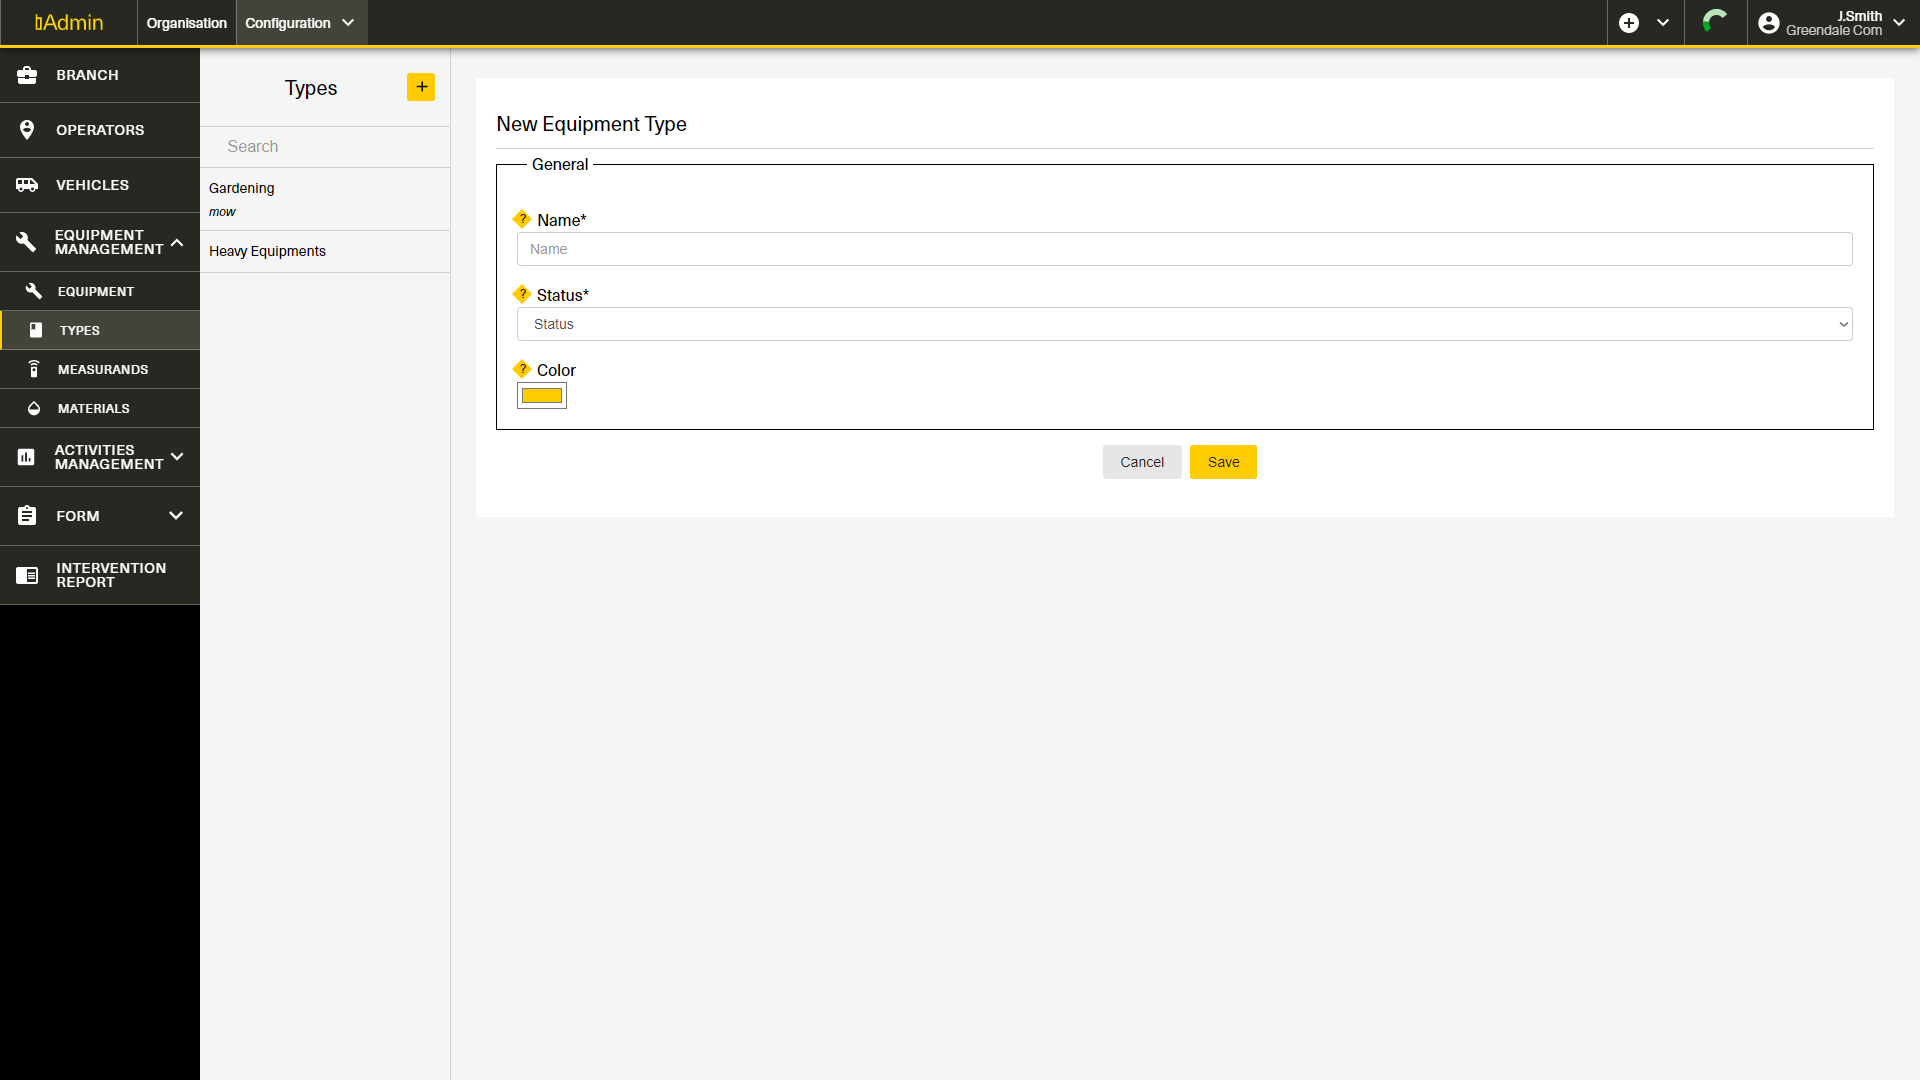
You can organize your equipment in types. This allows you a better analysis and a better organization of your equipment. When you create a type you need :
- Name
- Status : If your status is in the list you can select it, otherwise leave on status. We recommend leaving on "Status" if you are unsure.
- Color : Select the color used to represent this type of equipment.
Click "Save" when you are done creating your type.
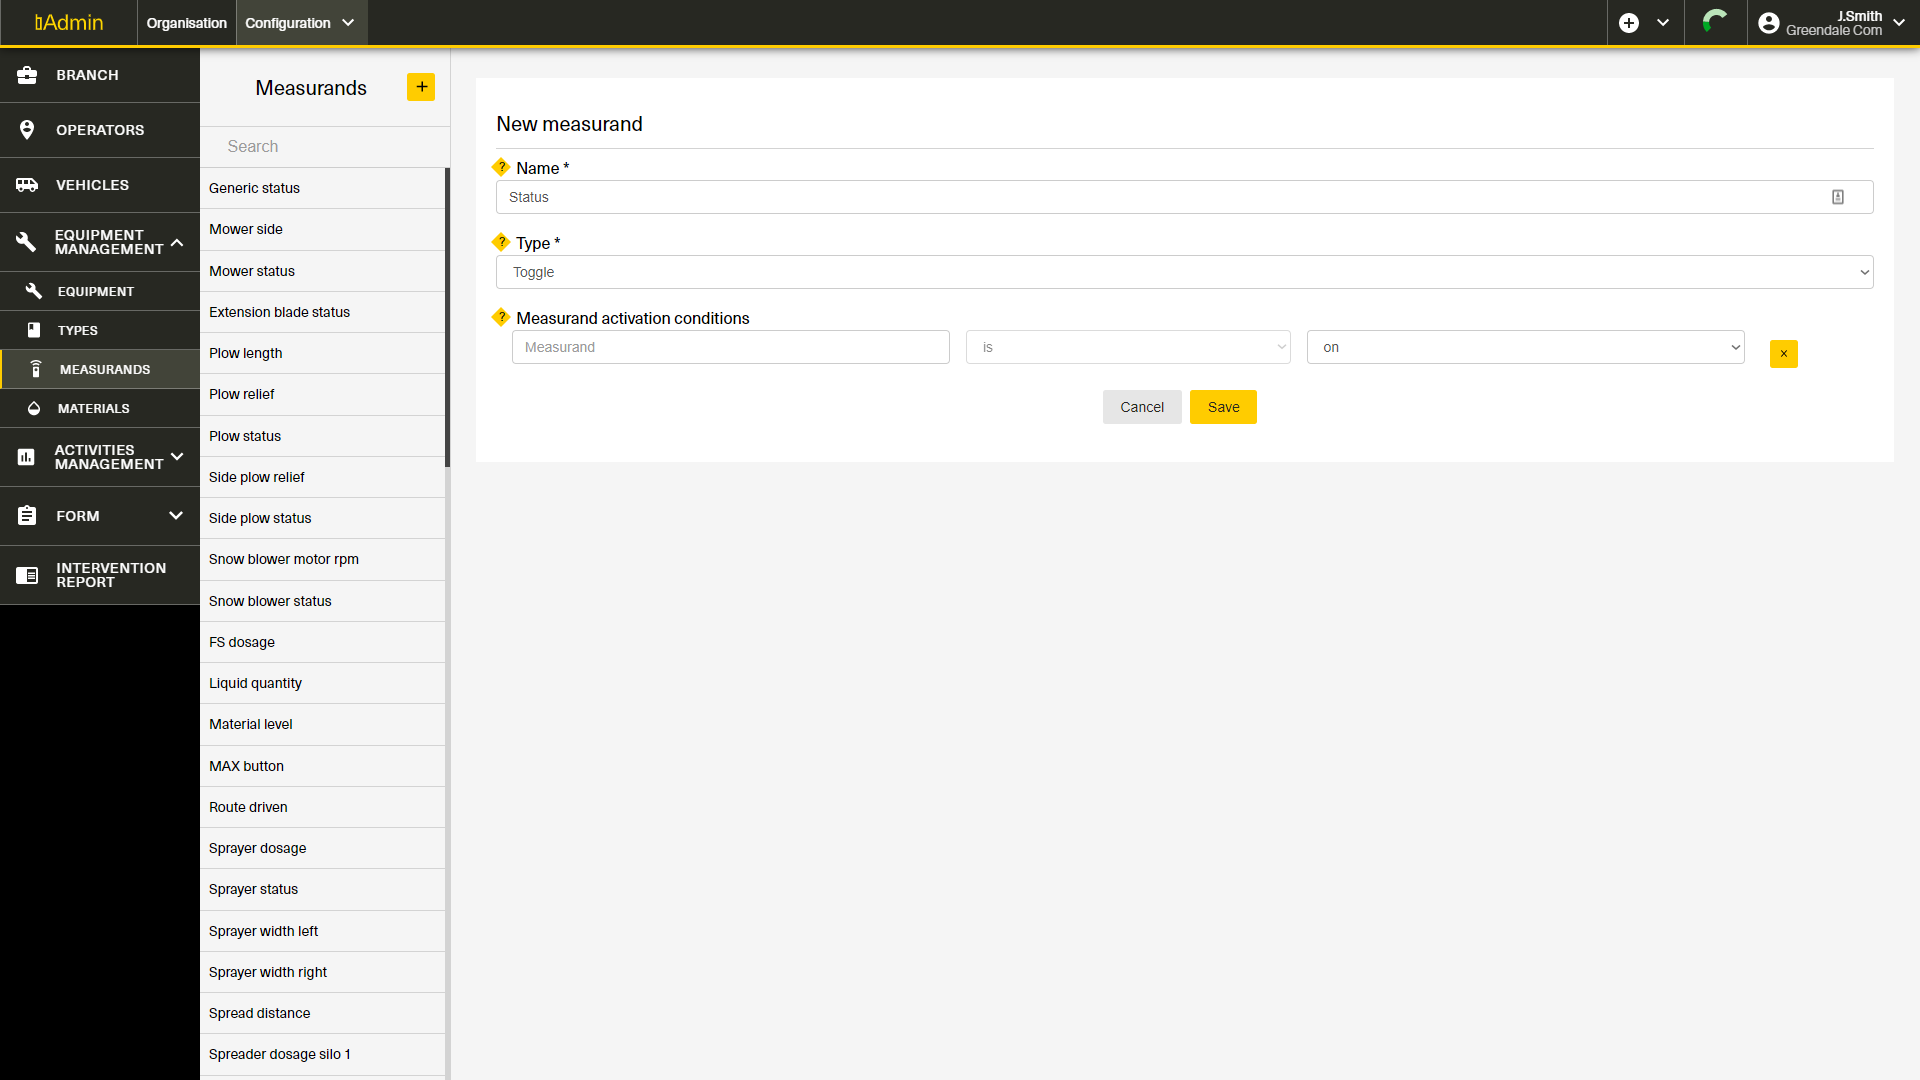
To measure what you are doing with your equipment or your vehicle, you have to create measurement. Check the measurement page by clicking on Equipment Management on the left menu then "Measurements". We have a few measurements pre-created for you. You can use them with any of your equipment or vehicles. But you can create a custom measurement by clicking on the "+" on top of your screen.
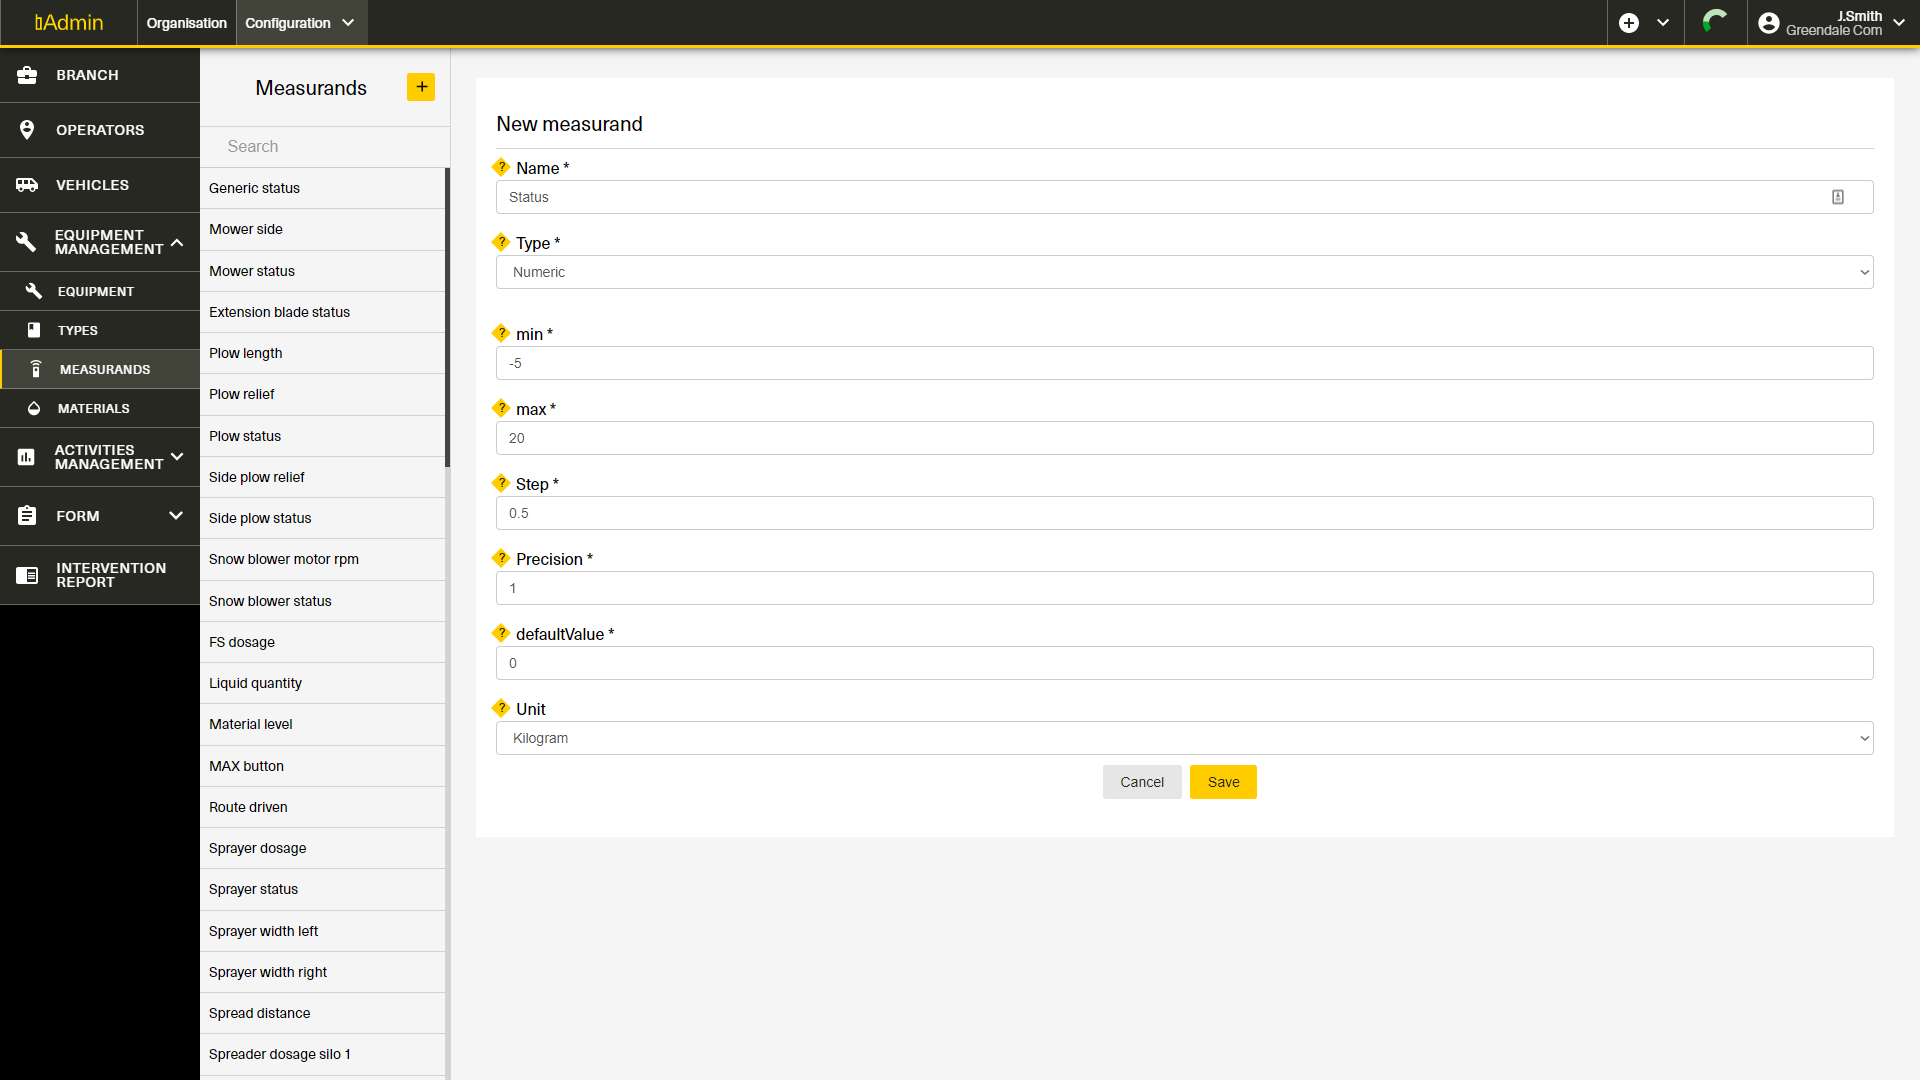
When you create a measurement, enter a name and a type. Several types of measurement exist :
- Toggle : A toggle is a simple on / off switch. You can also add a "measurement activation conditions" by clicking the "Add a field" button. This enables you to create a rule that the equipment or vehicle is on when this measurement is set to a certain value.
- Numeric : A numeric enables your operator or ConnectHub to enter a value within a certain set of rules. You can set a minimum value, a maximum value, step (the number by which the value is incremented or decremented), precision (the number of digits after the decimal point), defaultValue (the first value that will appear when starting to use this measurement) and the unit of this measurement.
- Counter : A counter is a simple value that you can increment or decrement starting with 0.
- List : A list enables the operator or ConnectHub to select a value within a predefined set of value. Click "Add a field" to add an element to your list. Then enter its name and check the defaultValue checkbox to mark this element as the default value for this measurement.
Click "Save" when your measurement is set.
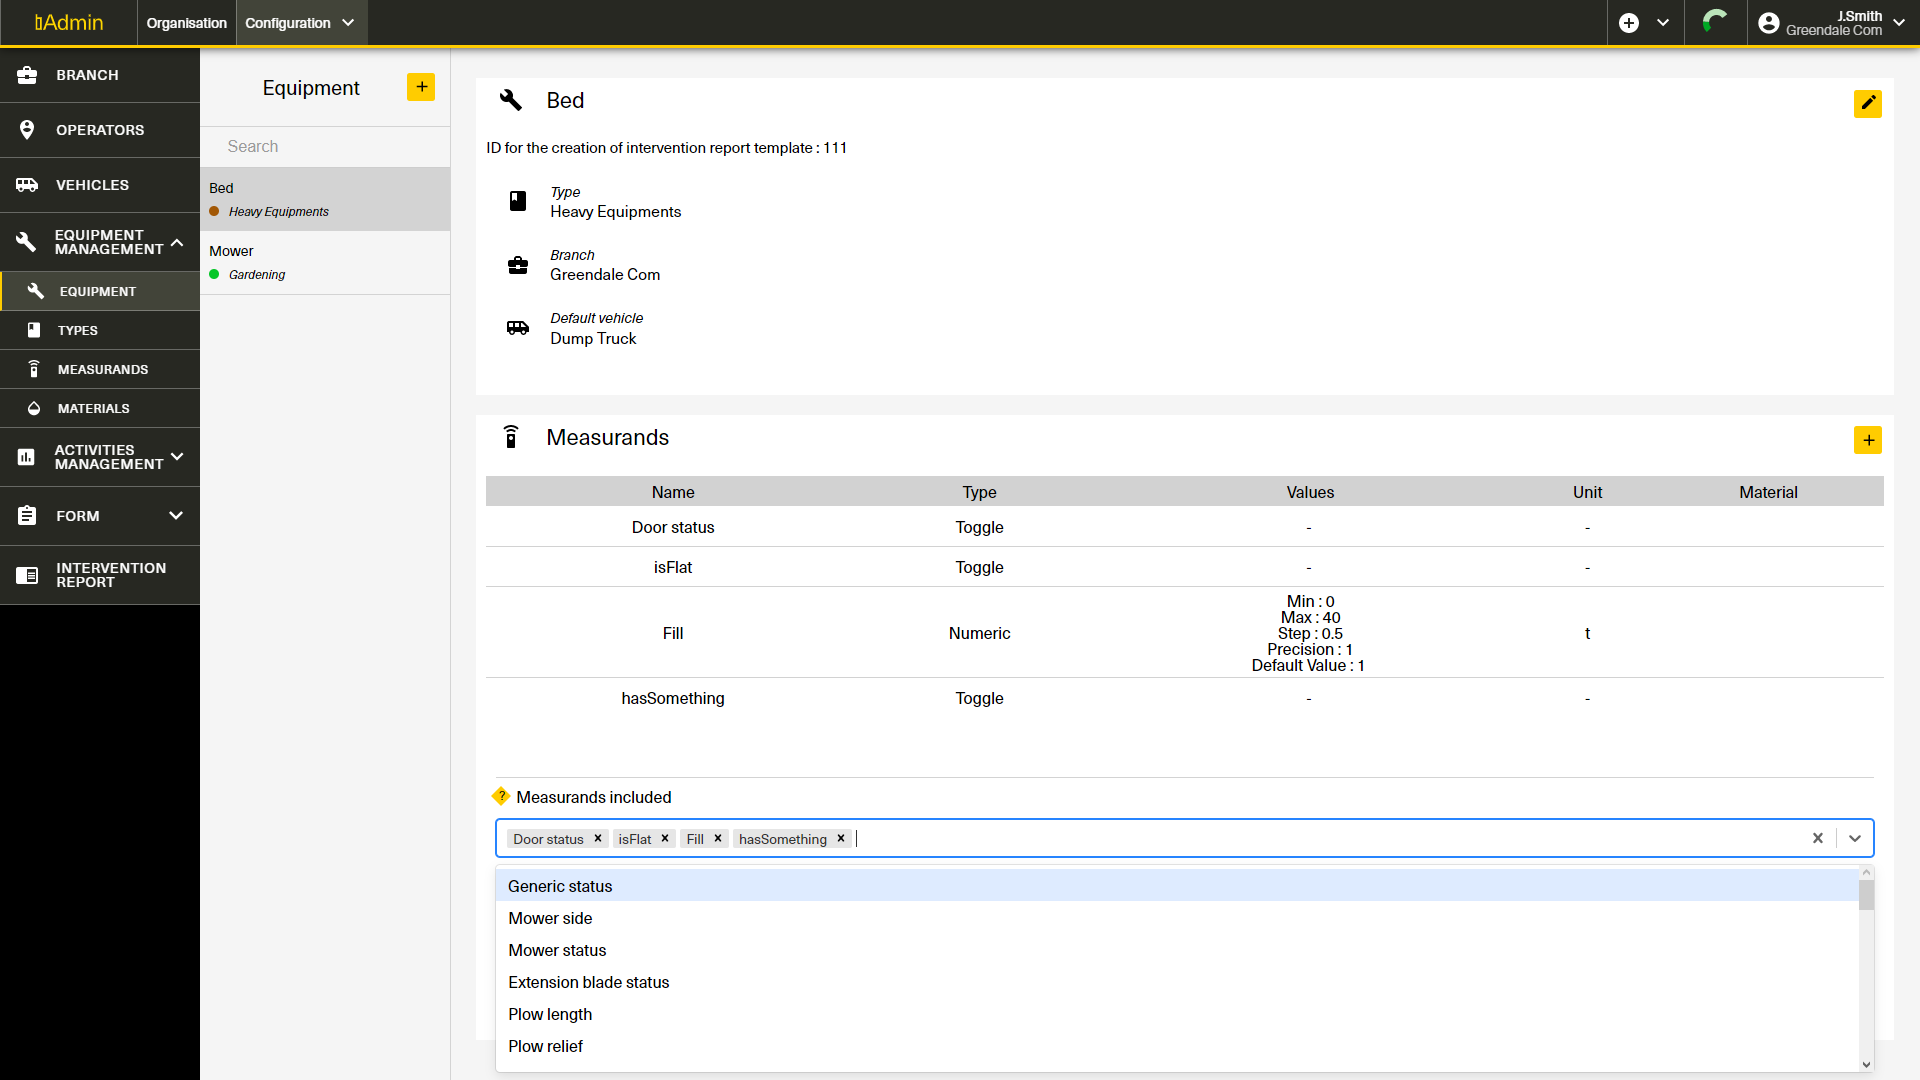
Once you have created a type and the measurements you need, you can create equipment. To view all your equipment, click on the menu element "Equipment management" and then "Equipment" to open the list of all equipment belonging to the currently selected branch.
You can create equipment by clicking on the "+" button and edit it by clicking on the pen button. When you create new equipment, you can enter an image, a name, select the branch to which it belongs, the type of this equipment and the default vehicle (if this equipment is mounted on a vehicle by default).
Finally, you can assign measurements to this equipment. Click on the "Select..." on the bottom of your screen and select the measurements you want to assign to this equipment by clicking on them from the list. You can also type the name of the measurement to search for it. To delete a measurement included with the equipment, click on the cross next to name of the measurement.
When you are done with the configuration of this equipment, click on the "Save" button in the bottom of your screen.
7. Activities
Activities are what operators are doing in the field. They enable you to know what an operator is doing. When you create an activity you can get several options and features that enable you to get more information.
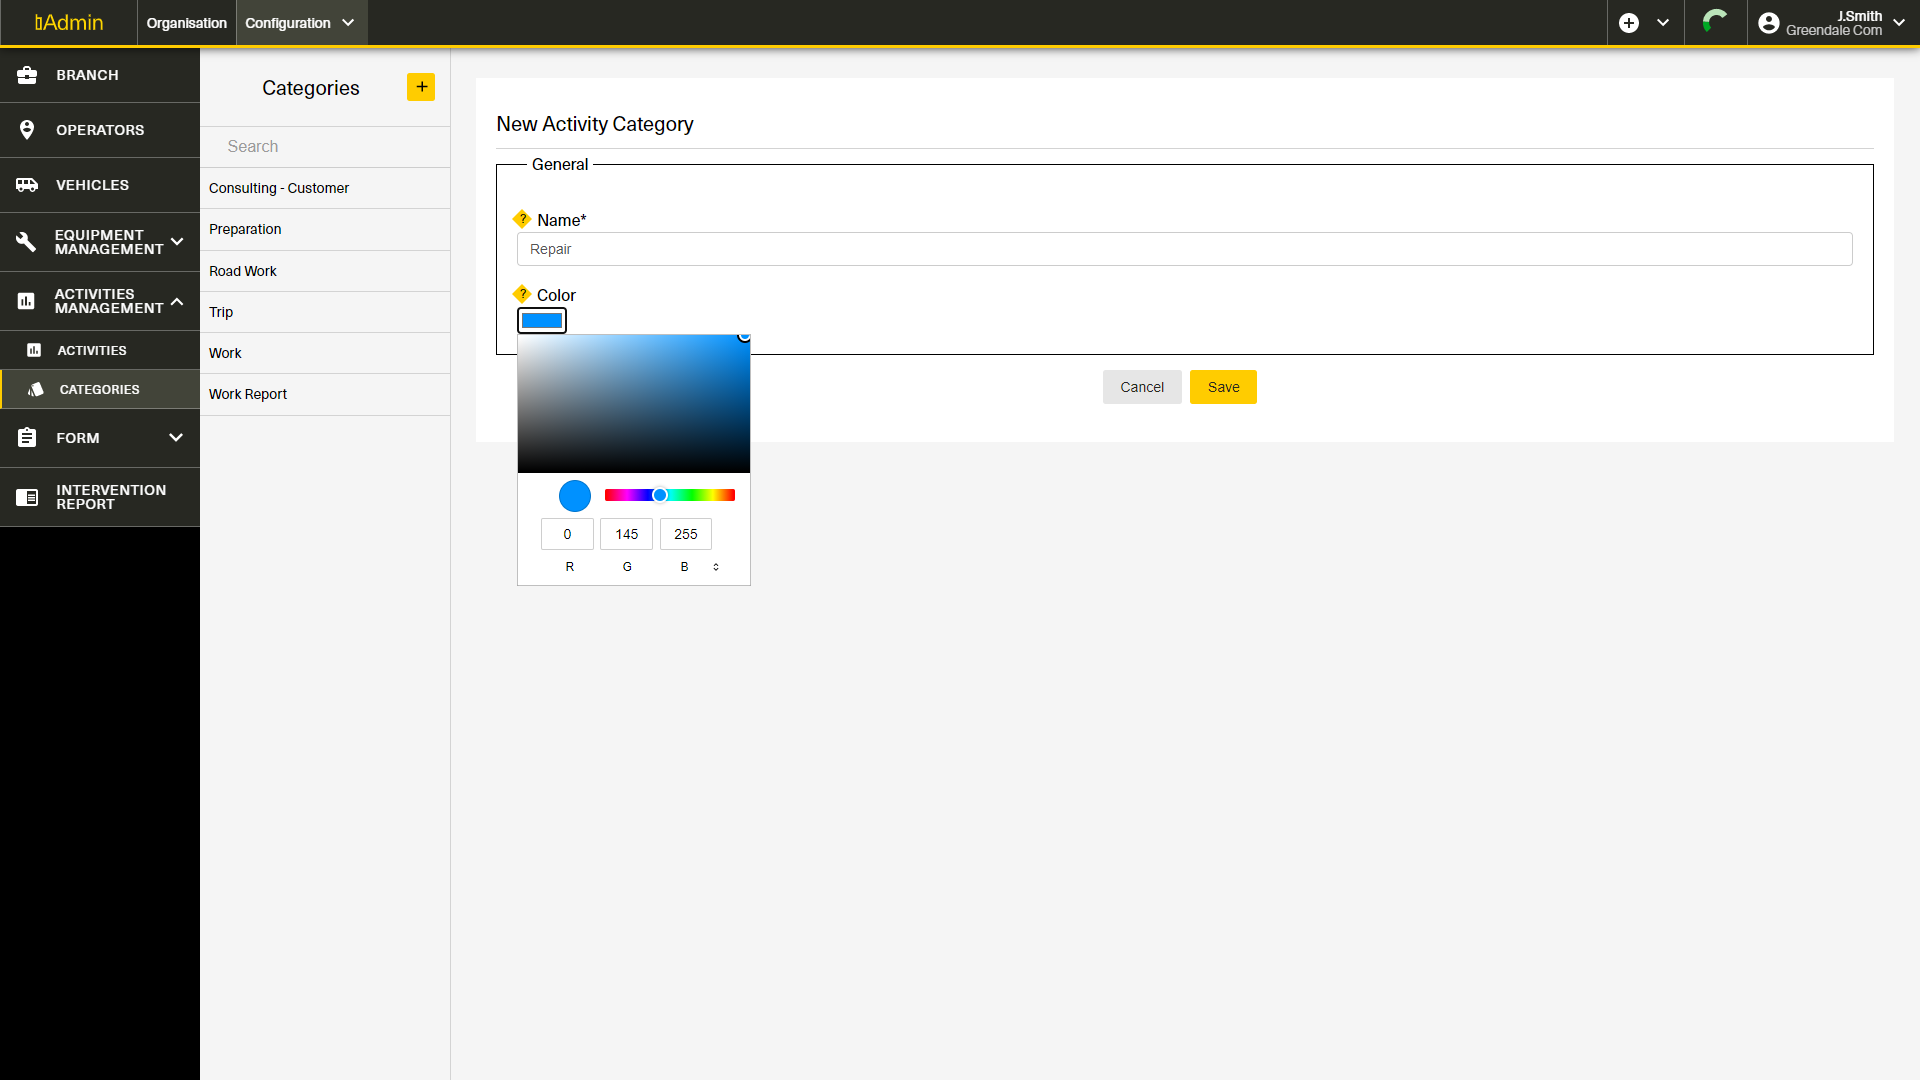
An activity belongs to a category. Categories of activity are used to organize activities for your operators to access the activity quickly, as well as for simple and good visualization on bVision. A category has a name and a color. The color is used to draw the path taken during the intervention in bVision and RWIS. Check our dedicated course for more information.
Once you have at least one category, you can create activities. To create an activity, open the Activities menu by clicking on "Activities management" in the left menu and then "Activities". This display the full list of all your activities. You can edit one by clicking on the pen button in the upper right corner. You can also create a new activity using the "+" button next to the Activities title.
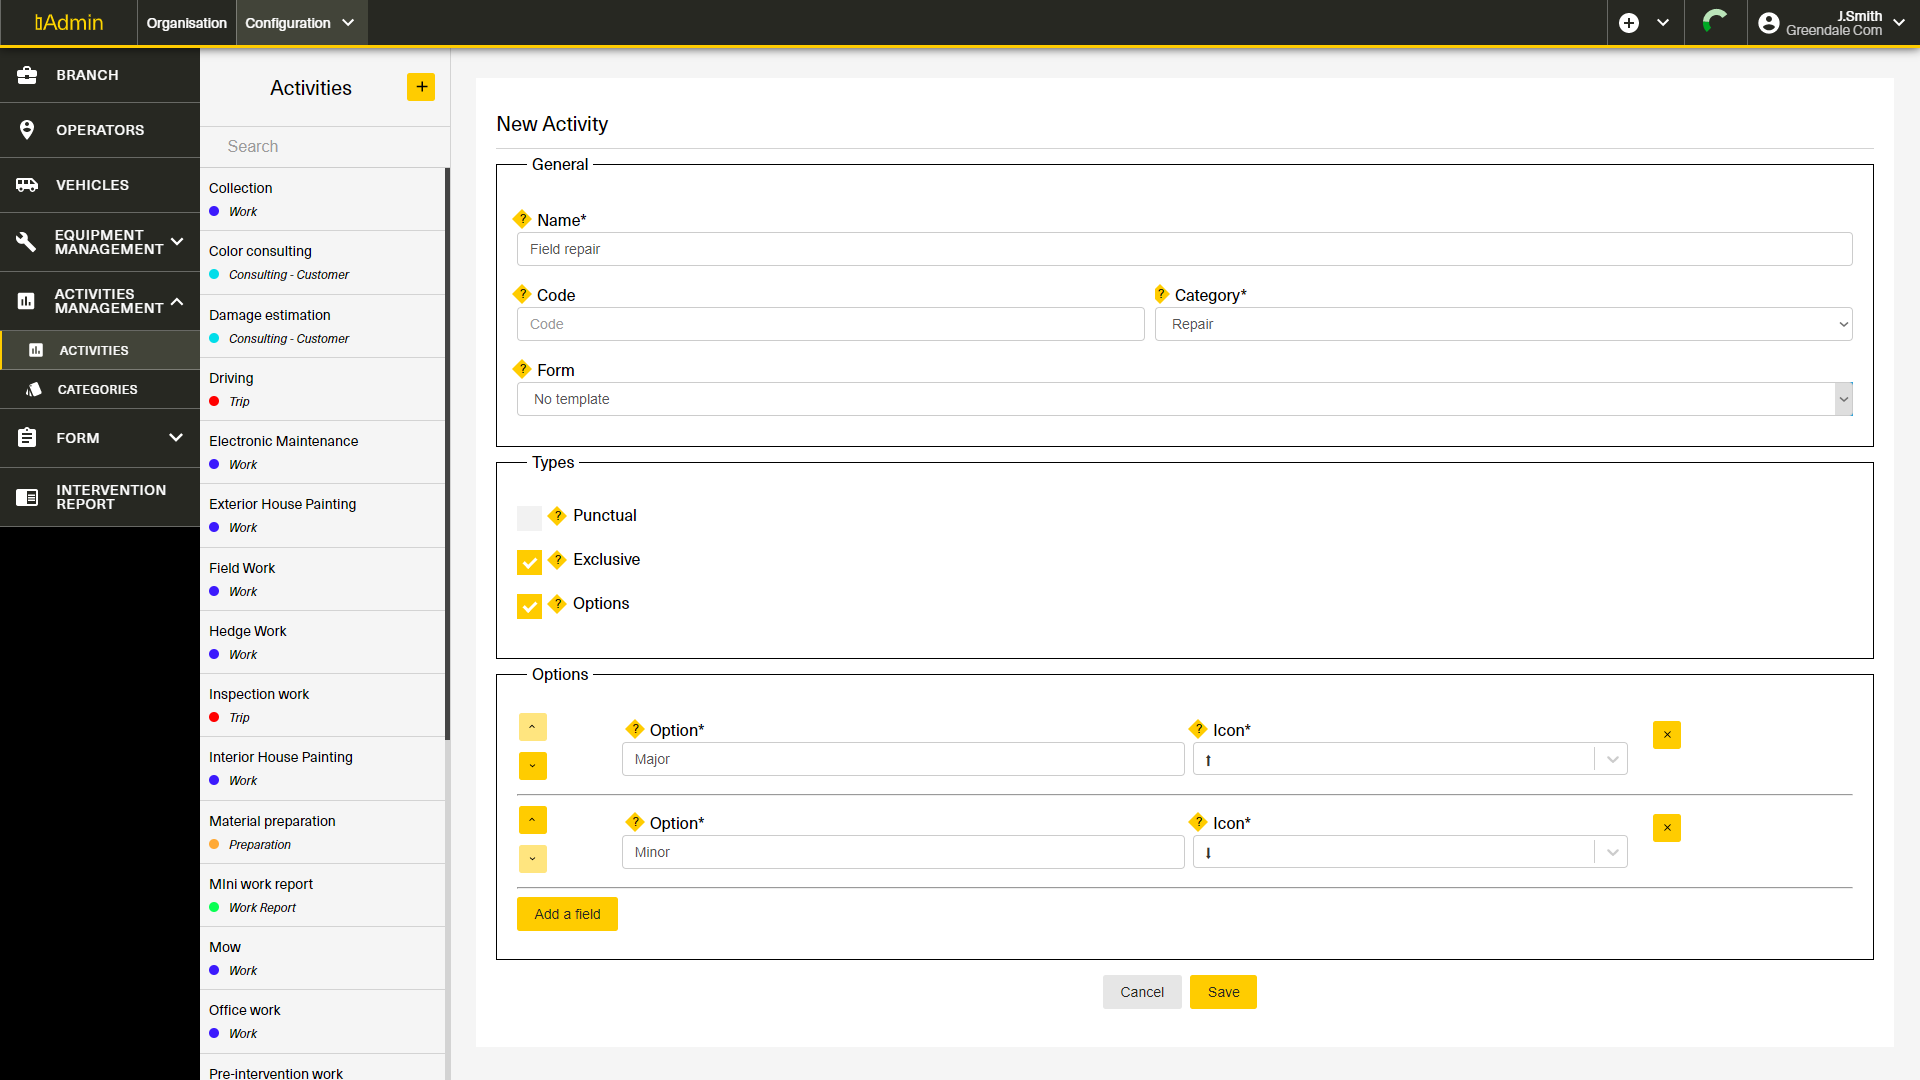
An activity has a name, a code (for quick identification) and belongs to a category of activities. It can also have a form. Check section 8 of this course for more information about forms.
Next, you can select different types for this activity :
- Punctual : A punctual activity is an activity that only happens at one precise time. When you start it, it will automatically revert back to it's off stage.
- Exclusive : An exclusive activity is an activity during which you cannot do anything else. Exclusive activities are marked by a yellow "START" button. Click on this button to start doing the activity. Once you are finished with this activity, click on the "FINISH" button on the bottom of your screen.
- Options : An activity with options is an activity with several possibilities. Options are displayed as icons with a text next to it. For example, an activity "Repairs" can have options such as "Minor" or "Major". To add options, tick the "Options" checkbox and then click on the "Add a field" yellow button below. You can then enter a name for your options, as well as select an icon for it. This icon will be used to display the options in bMoves app.
Your intervention can cumulate several types. For example, you can have an exclusive activity with options or a punctual and exclusive activity.
8. Form
With our forms feature, you can create a form to get more insights about an activity or to have your users fill reports directly on the field. By default, we created an example form for you. But you can create the form you need. To do so, you first need to create field templates.
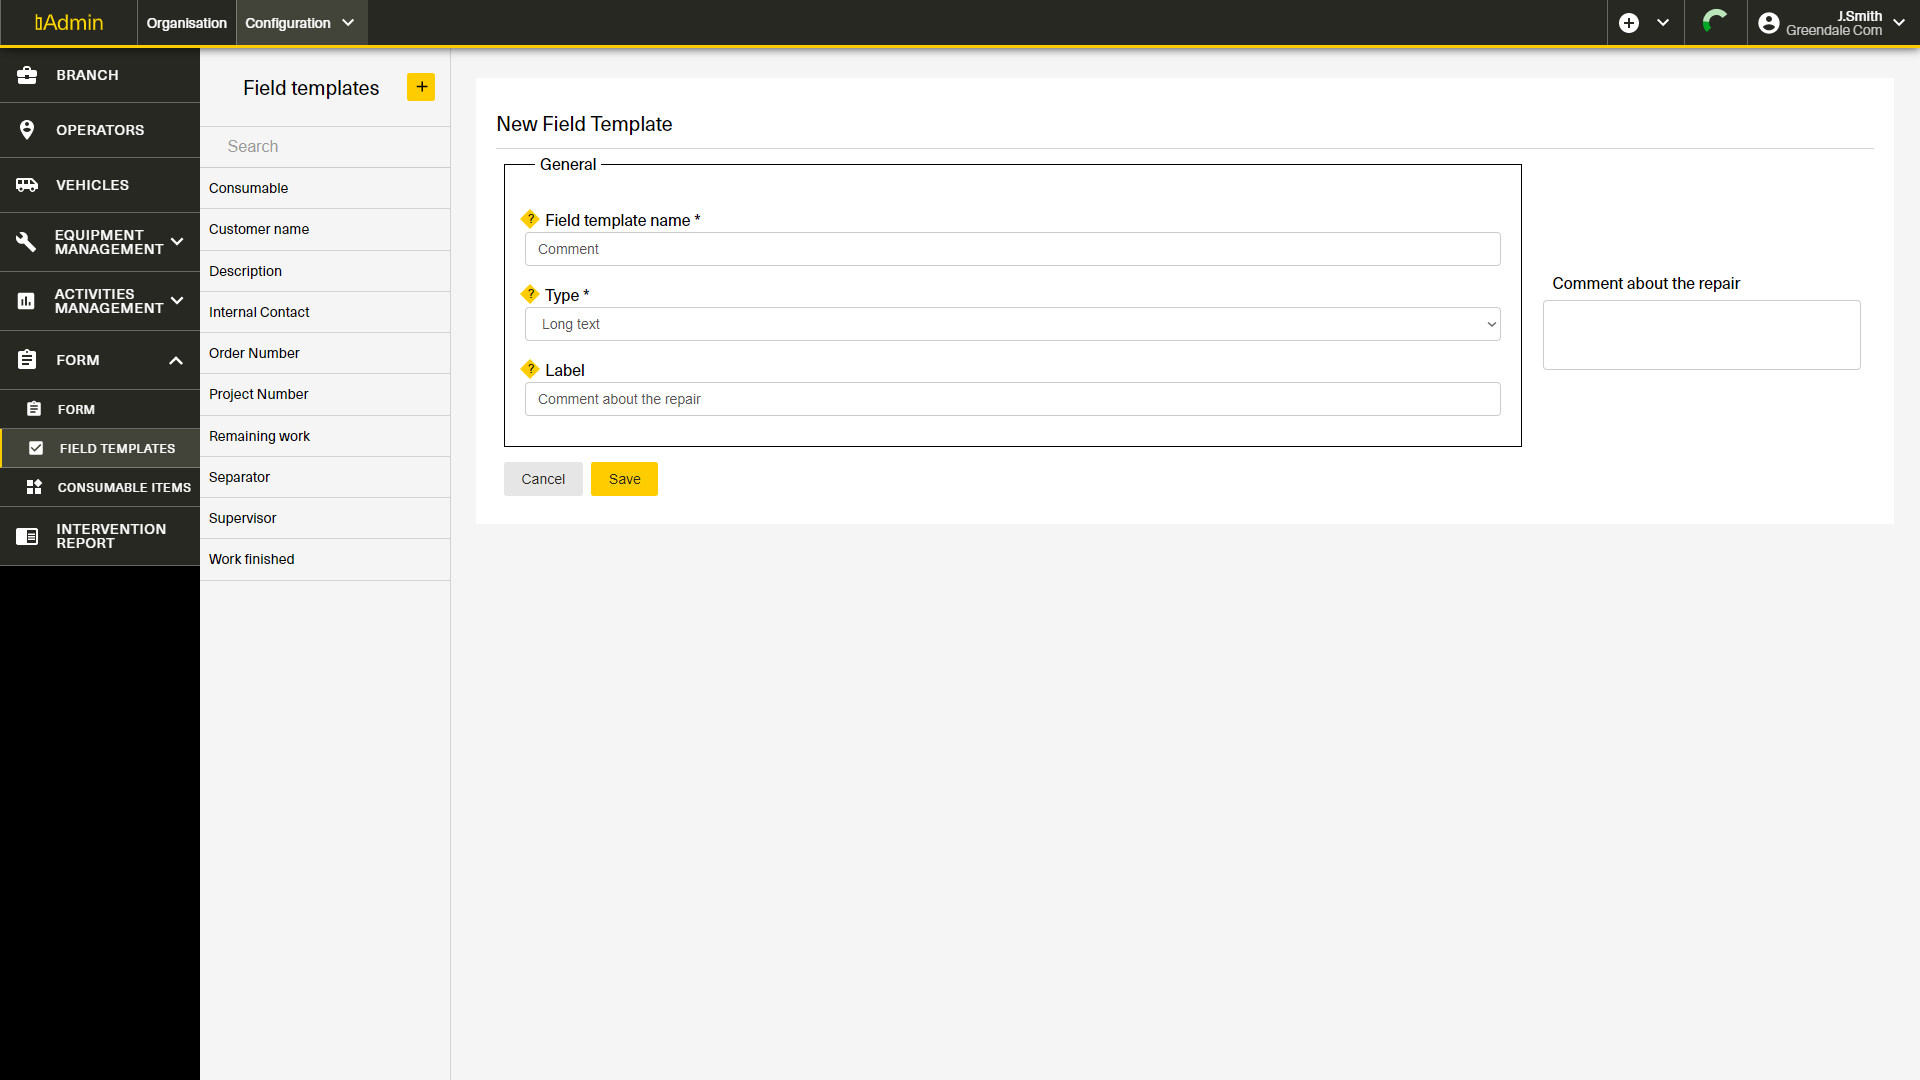
Field templates are elements you use to create the form. They can be of several types :
- Short text : A simple input field to enter a short text (up to 200 characters)
- Long text : A input field for long text (up to 400 characters)
- Single checkbox : A checkbox that can be ticked or not
- Separator : Used to separated your form. You can name the separator to make it a title for example.
- Dropdown : The dropdown is a select field that enables the user to select a value in a given list.
- Catalog of consumable items enables the user to pick a consumable item from a list of consumable items you created. The operator can then select the quantity of this consumable item he used.
A field template has a name and a label. The name is used for you to identify the field templates and act as the default label. However, if you fill the Label field, you will create a specific label. For dropdown fields, you can click on "Add a field" to add new value in it. The field Key is what the operator will be able to pick and the field value is the value attached to this field.
When you put a field of type catalog of consumable items in your form, operators will be able to pick the consumable used in a list of all consumable available. You can create this list of consumable items in bAdmin. Click on the "pen" button in the top right corner and click on the "+" button next to Consumable items on the left to create a new consumable item.
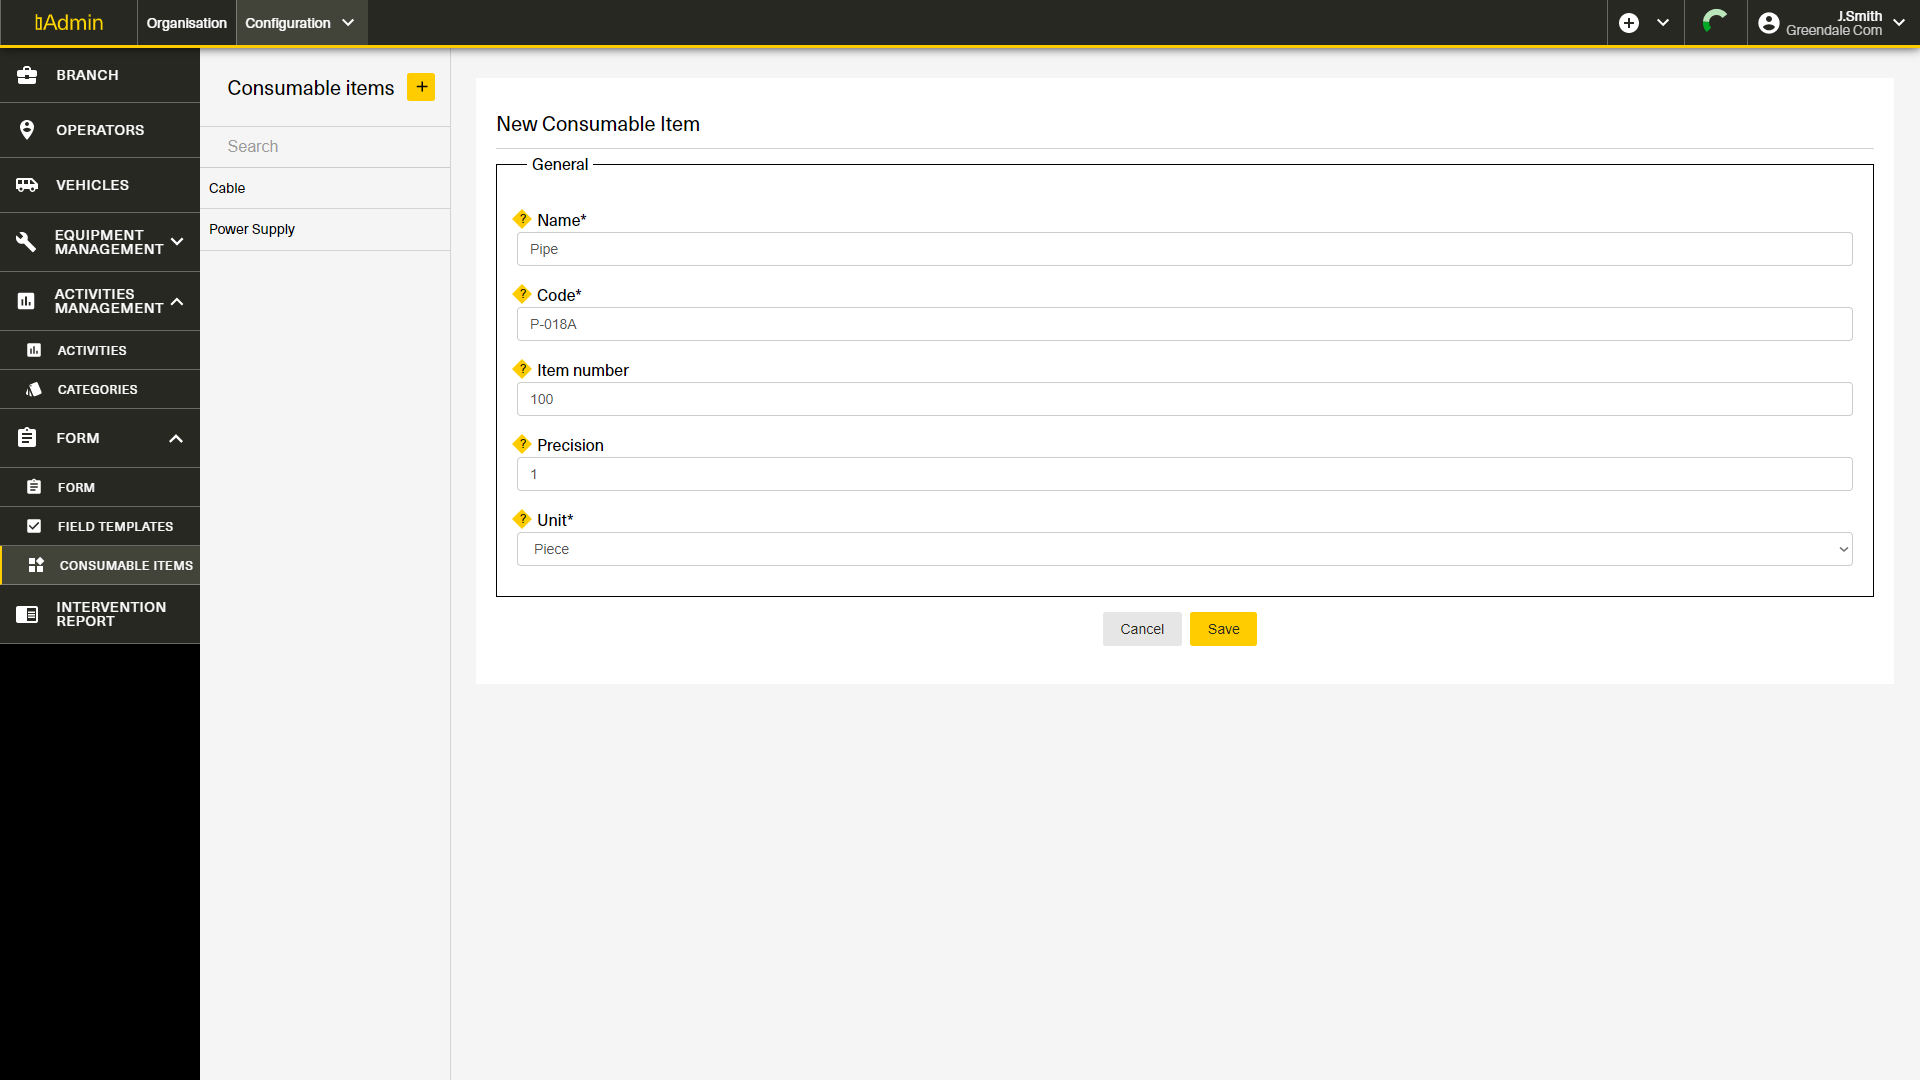
When you create a new consumable item, you have to enter the following information :
- Name : The name of the consumable item used for sorting and for selection by your operators.
- Code : A code for quick search and selection of the consumable items.
- Precision : The number of digits after the decimal point that will be shown when selecting this consumable item.
- Unit : The unit used for this consumable item.
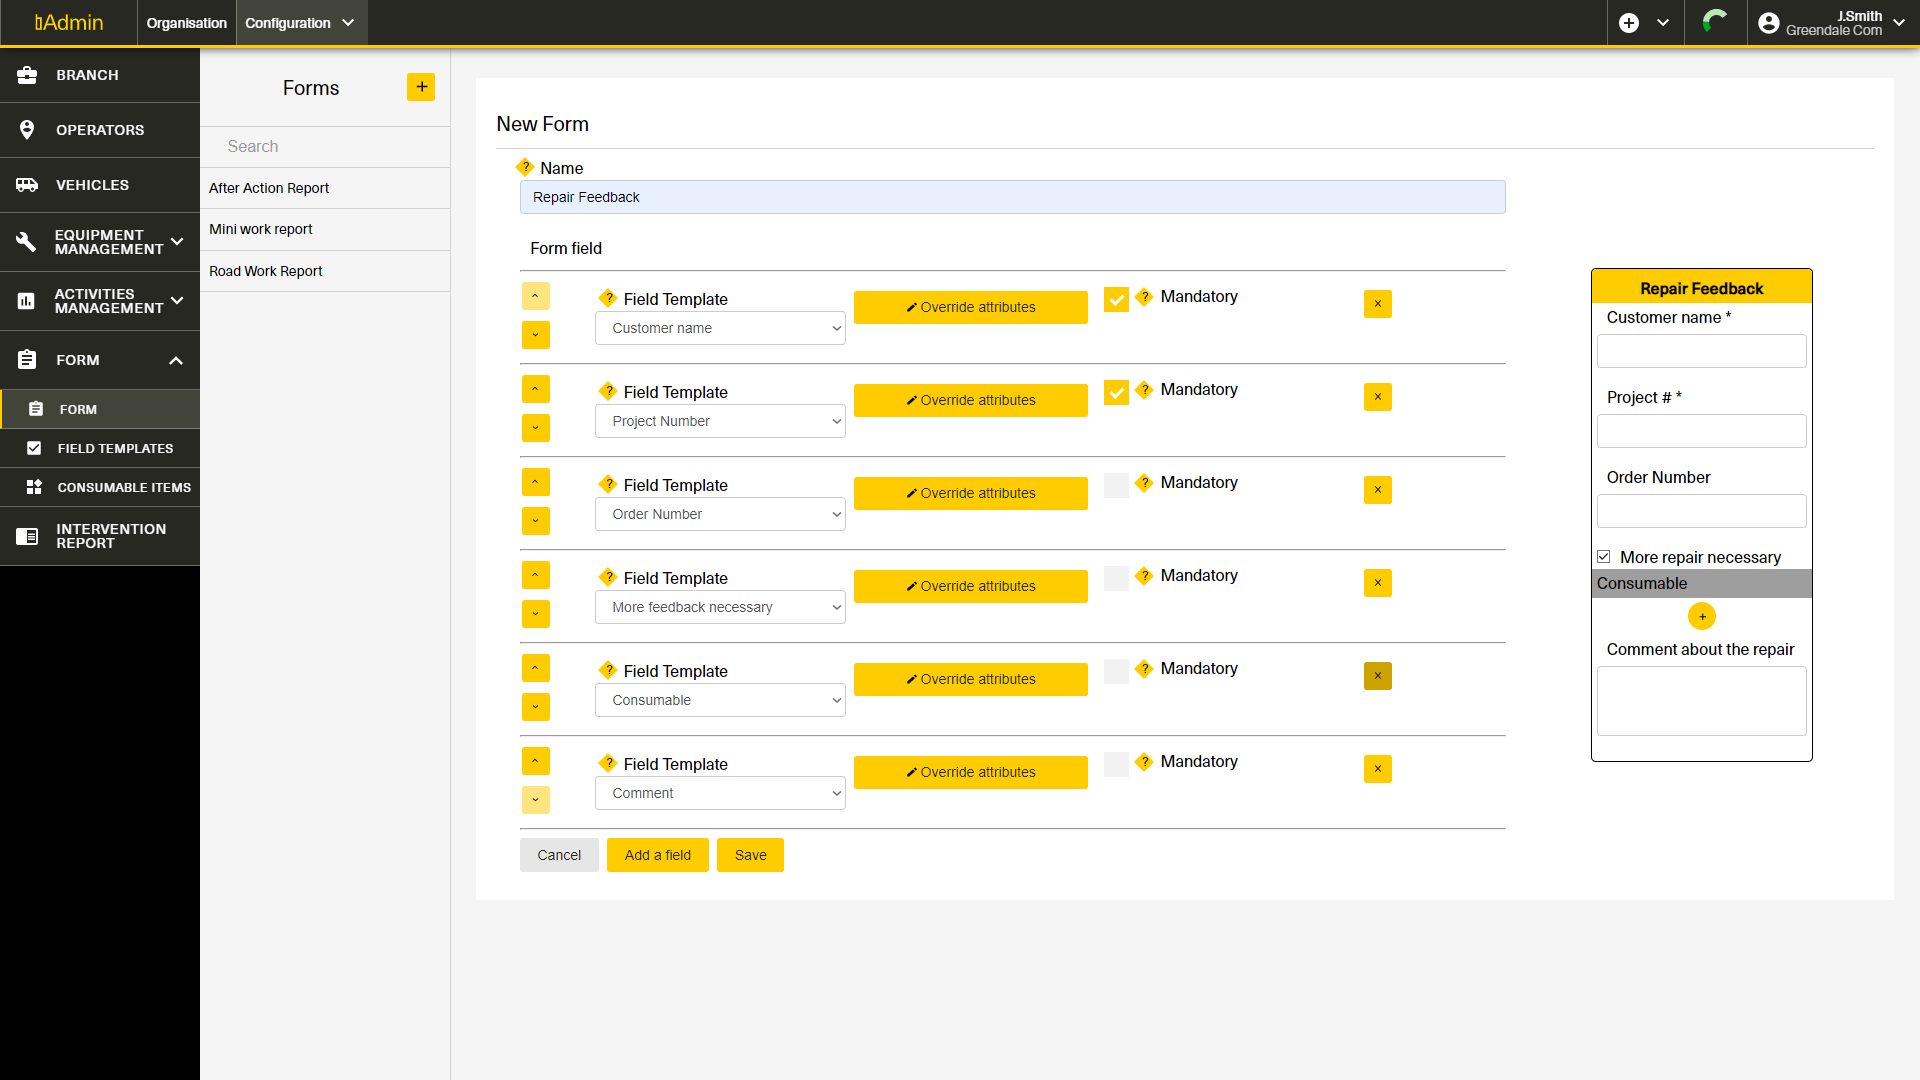
Now that you have your field templates and consumable items created, you can create your form. By default we created an example of a form for you, you can either edit this form or create a new one. All the forms you have are available in the forms tab by clicking on "Form" on the left menu and then clicking on "Form" on the sub-menu.
You can edit an existing form by clicking on the "pen" button in the top right corner. You can create a new form by clicking on the "+" button on the left. When you create a new form, you have to give it a name, this name will be used to organize your forms in bAdmin. You can then enter the fields you need in your form. To do so, just click the "Add a field" button to add one field in your report. This will add one field in your form. On the left of your screen, you can see an overview of what your form will look like for your operators.
You can tailor your form by changing some information for each field :
- Use the up and down chevron button on the left to change the position of the field in your form.
- Use the "Field template" select to choose which field you want to display on this line. Be careful, you can use each field template one time in each form.
- The "Override attributes" button enables you to tailor this field when used in this specific form, by changing the attributes such as the label. For example, a field template labelled "Description" can be labelled "Description of unfinished work" in a form.
- Tick the mandatory checkbox to force your operators to fill this field when creating the form. They will not be able to finish the form for as long as they do not fill all mandatory fields.
When your form is ready with all the fields you need, click on "Save".
The last thing to do for your operator to be able to use the form, you have to link it to an activity. As described above you can do this directly in an activity. Open the activity you want and click on the select "Form" to choose the form you want to link to this activity. Press "Save" when it's done.
You can also link the form to an activity directly from your form.
- Select the form you want to attach to an activity.
- On top of your screen, click on the yellow "Link an Activity" button.
- In the list of all activities, choose the one you want to link by clicking the checkbox (you can link the form to more than one activity if you want)
- Press "OK" when you are done.
9. Intervention report
You can upload your report template in bAdmin. A report template will be used to generate reports about one or more interventions. By default, we have predefined reports built-in for you but you can customize them or create new reports tailored to your needs.
Check our course to learn how to build a new report.
To upload a new report template on your platform:
- Click on the "+" icon on top of the intervention report screen.
- Drag the .xlsx report template in the field on the top of your screen
- Give a name to this report template. This name will be used when exporting your report in bVision.
- Use the field description to describe your report template. This is used for you to know what this report do without having to open it.
- Select the type of your report singleIntervention to export data from one intervention or multipleInterventions to aggregate data from several selected interventions.
You can then generate your reports with bVision.
10. Users and User groups
Let's move to the configuration of your organization. To access the menu to configure your organization, click on "Organisation" in the upper menu. On the left menu, you know have access to :
- Dashboard : See section 1 for more information about the dashboard
- Users : See below for more information about your users
- User Groups : See below for more information about the User Groups
- bMoves usage : See section 11. for more information
- Subscription : See section 12. for more information
- Help Center : See section 13. for more information
Users are the person accessing bMoves on your behalf. You can create as many users as you need with every plan. Note that users and operators are different. Users are the person who uses the solution and the operators are the people doing the intervention. While a bMoves account is needed to do interventions, you might have operators in an intervention without an account.
To create a user you need the following information :
- Email address or username : You can enter either an email address or a username to serve as a credential for the user. If you provide an email address, bMoves will automatically send an email to invite the user to join bMoves.
- First name and last name
- Password : You need to enter an initial password for the user. He will be able to change this password later. Note that you have to give the password to the user yourself. bMoves does not send it for you.
- You can also select the language used by the user and a phone number
- User groups : You can assign a user group to the user. Check below for more information about users.
You can provide your users access to any of the tools within bMoves' solution by using a User Group. By default, bMoves comes with three User Groups :
- Administrator : Access to all the tools within bMoves.
- Manager : Access to the tools needed to do, visualize and export interventions.
- Operator : Access to bMoves app to start interventions on the field.
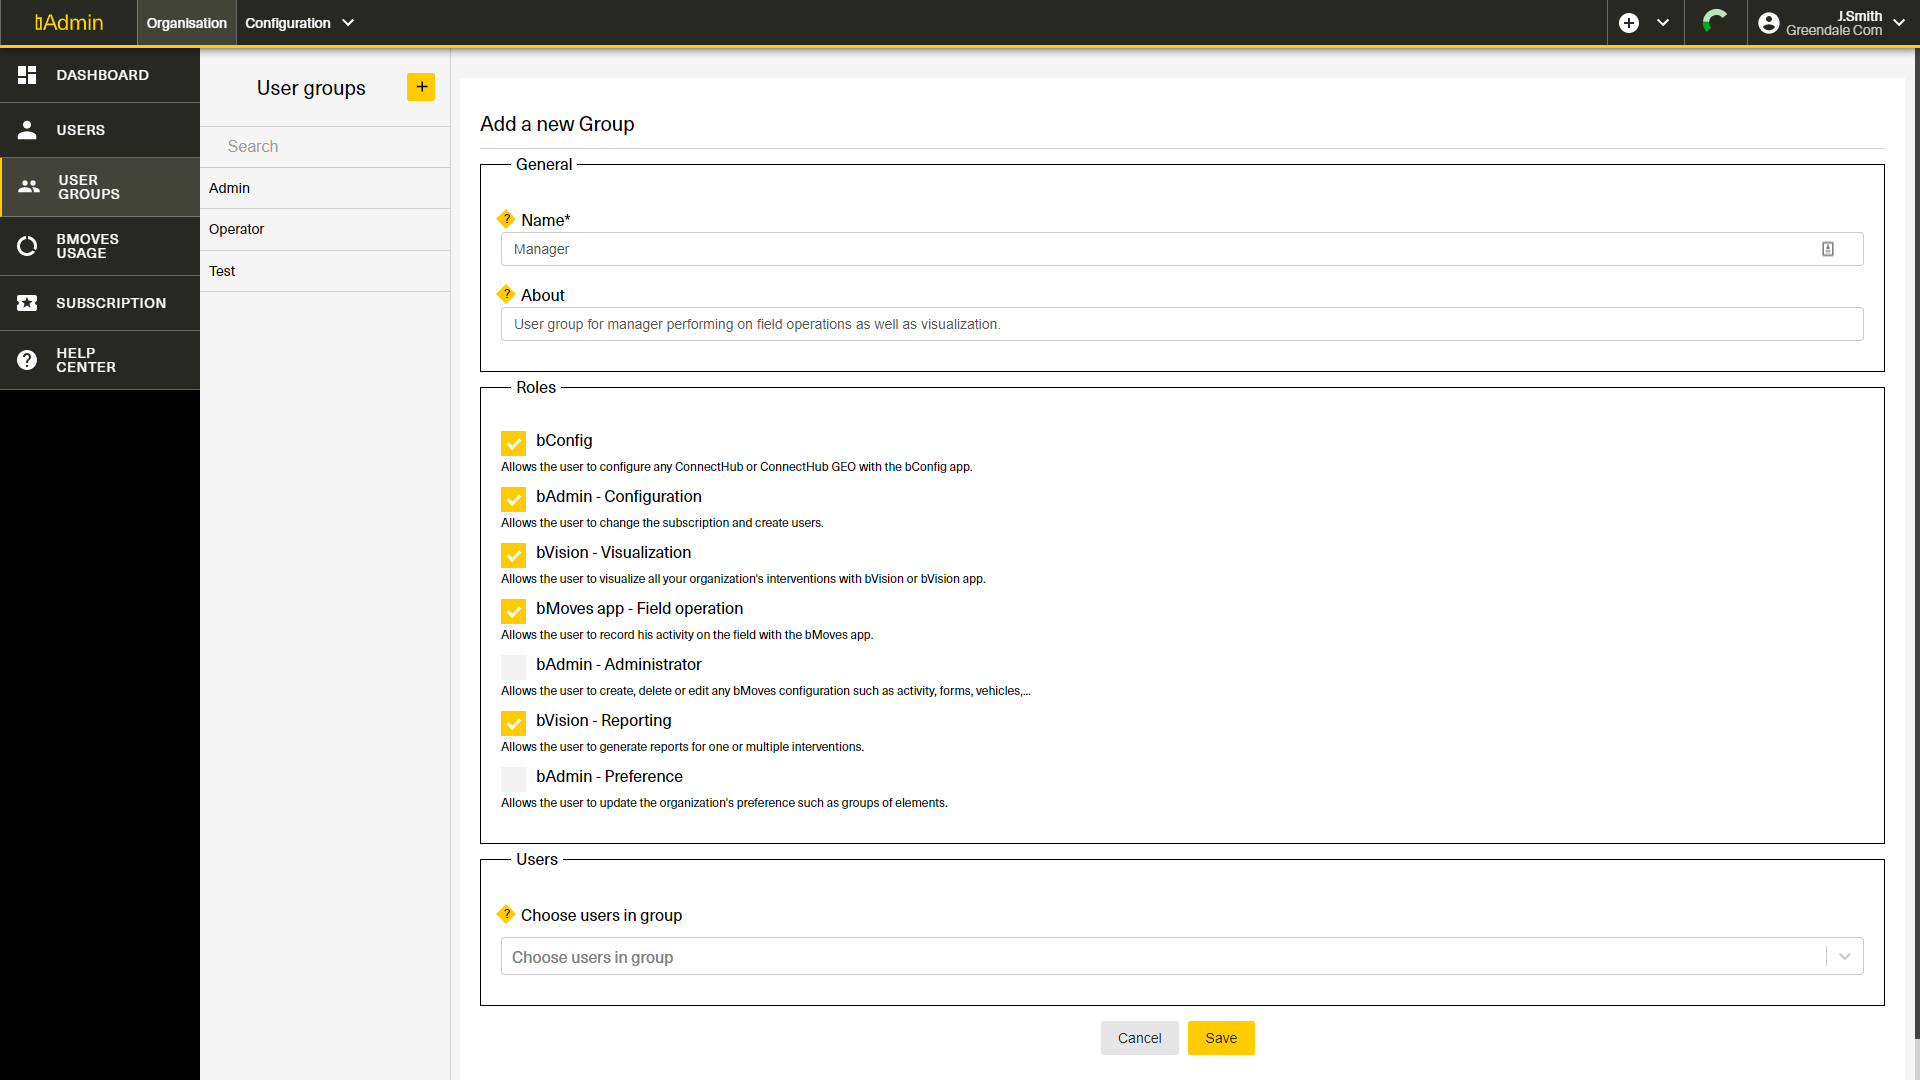
But you can also create your custom User Group.
- Click on the yellow "+" button.
- Give a name to your User Group. You can also fill the field about to provide more information about why you created this field.
- Select the roles you want to include in this User Group by ticking the checkbox on the role you need.
- Select the users to whom you want to give this User Group
11. bMoves usage
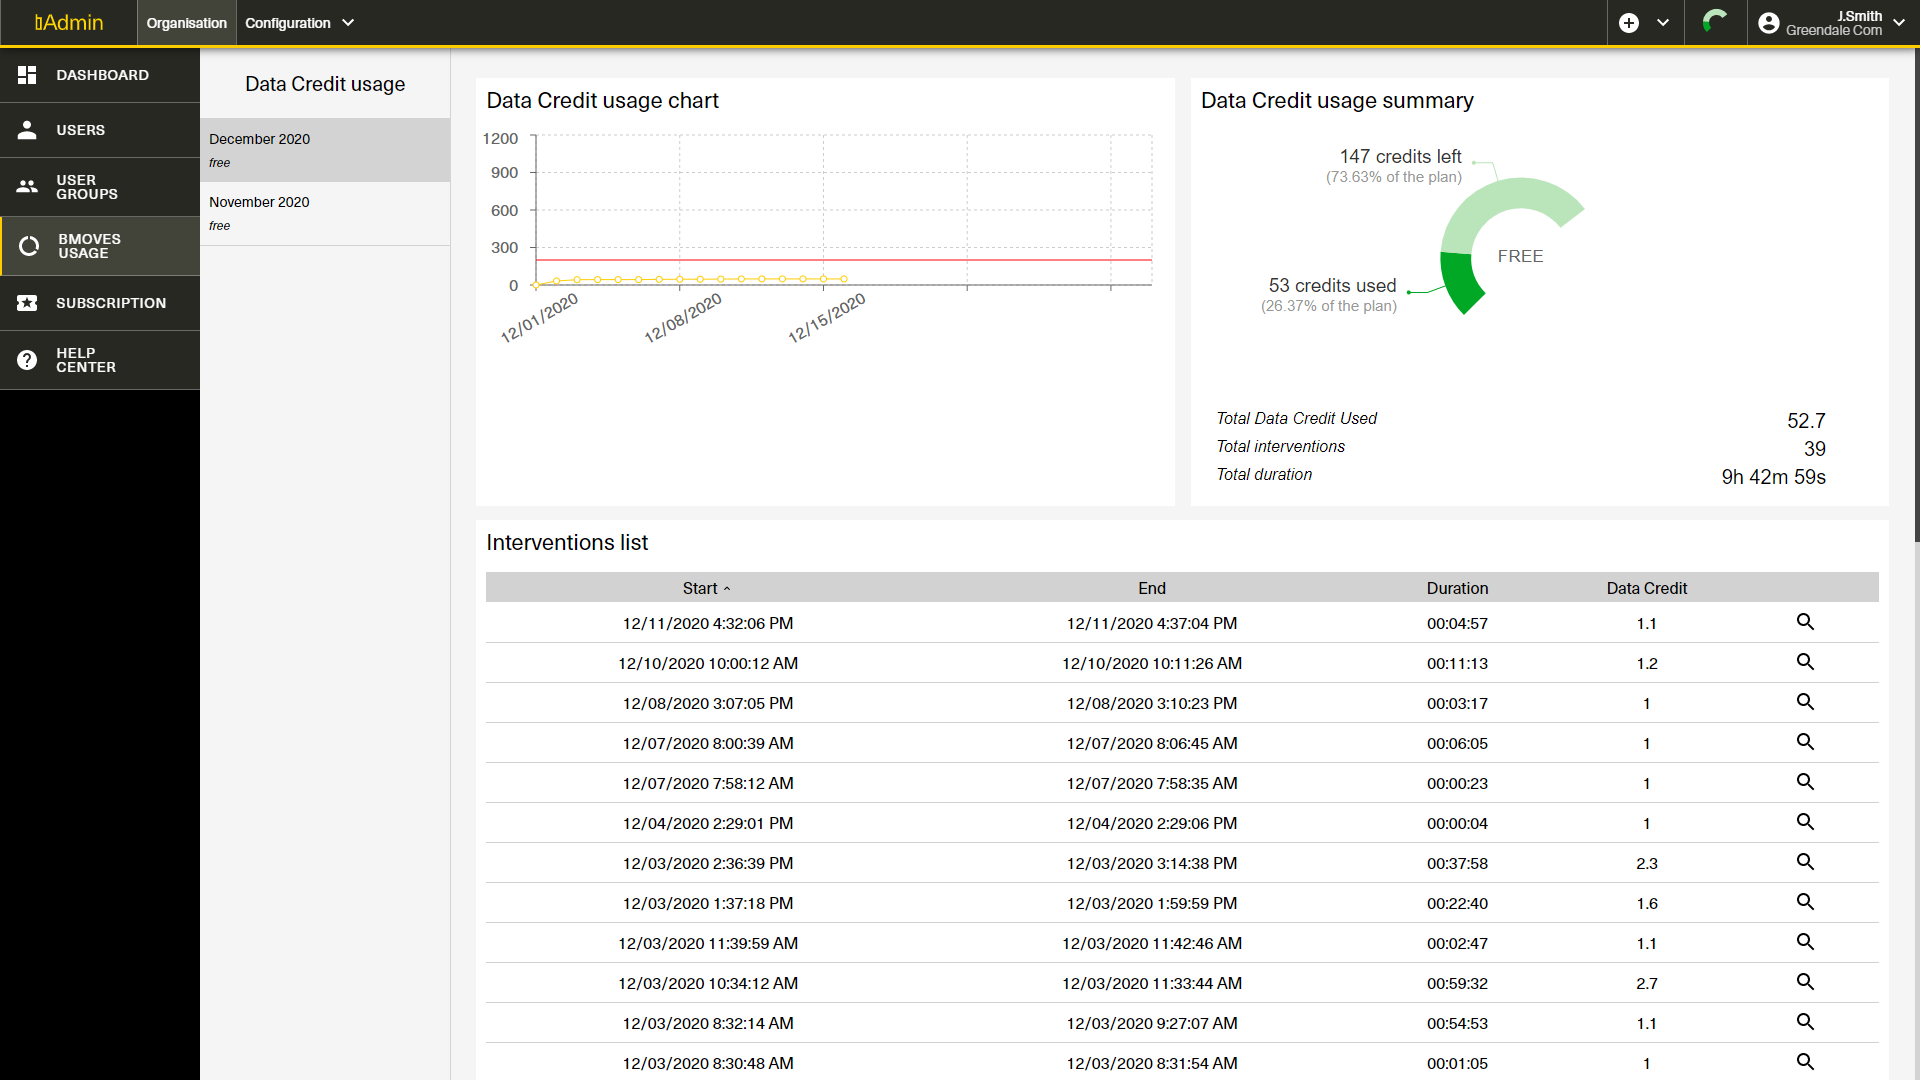
On the bMoves usage page, you can check your organization's usage of bMoves and the status of your monthly available Data Credits. Data Credits are the currency we use to measure the intervention you do with bMoves app. In the list on the left, you can select the month you desire to review. By default, the current month will be open.
First, thanks to the Data Credit usage chart, you can monitor the evolution of your usage of Data Credits. The red line represents your monthly limit of Data Credits.
The Data Credit usage summary offers a pie chart to view the amount of Data Credits used during this month and the amount of Data Credits remaining within your plan.
Finally, below you can find a list of all interventions carried during the selected month. You can see the start date, the end date, the duration and the amount of Data Credits the intervention weighted. Click on the label of one column to sort the list. Click on one intervention in the list to visualize it in bVision.
12. Subscription
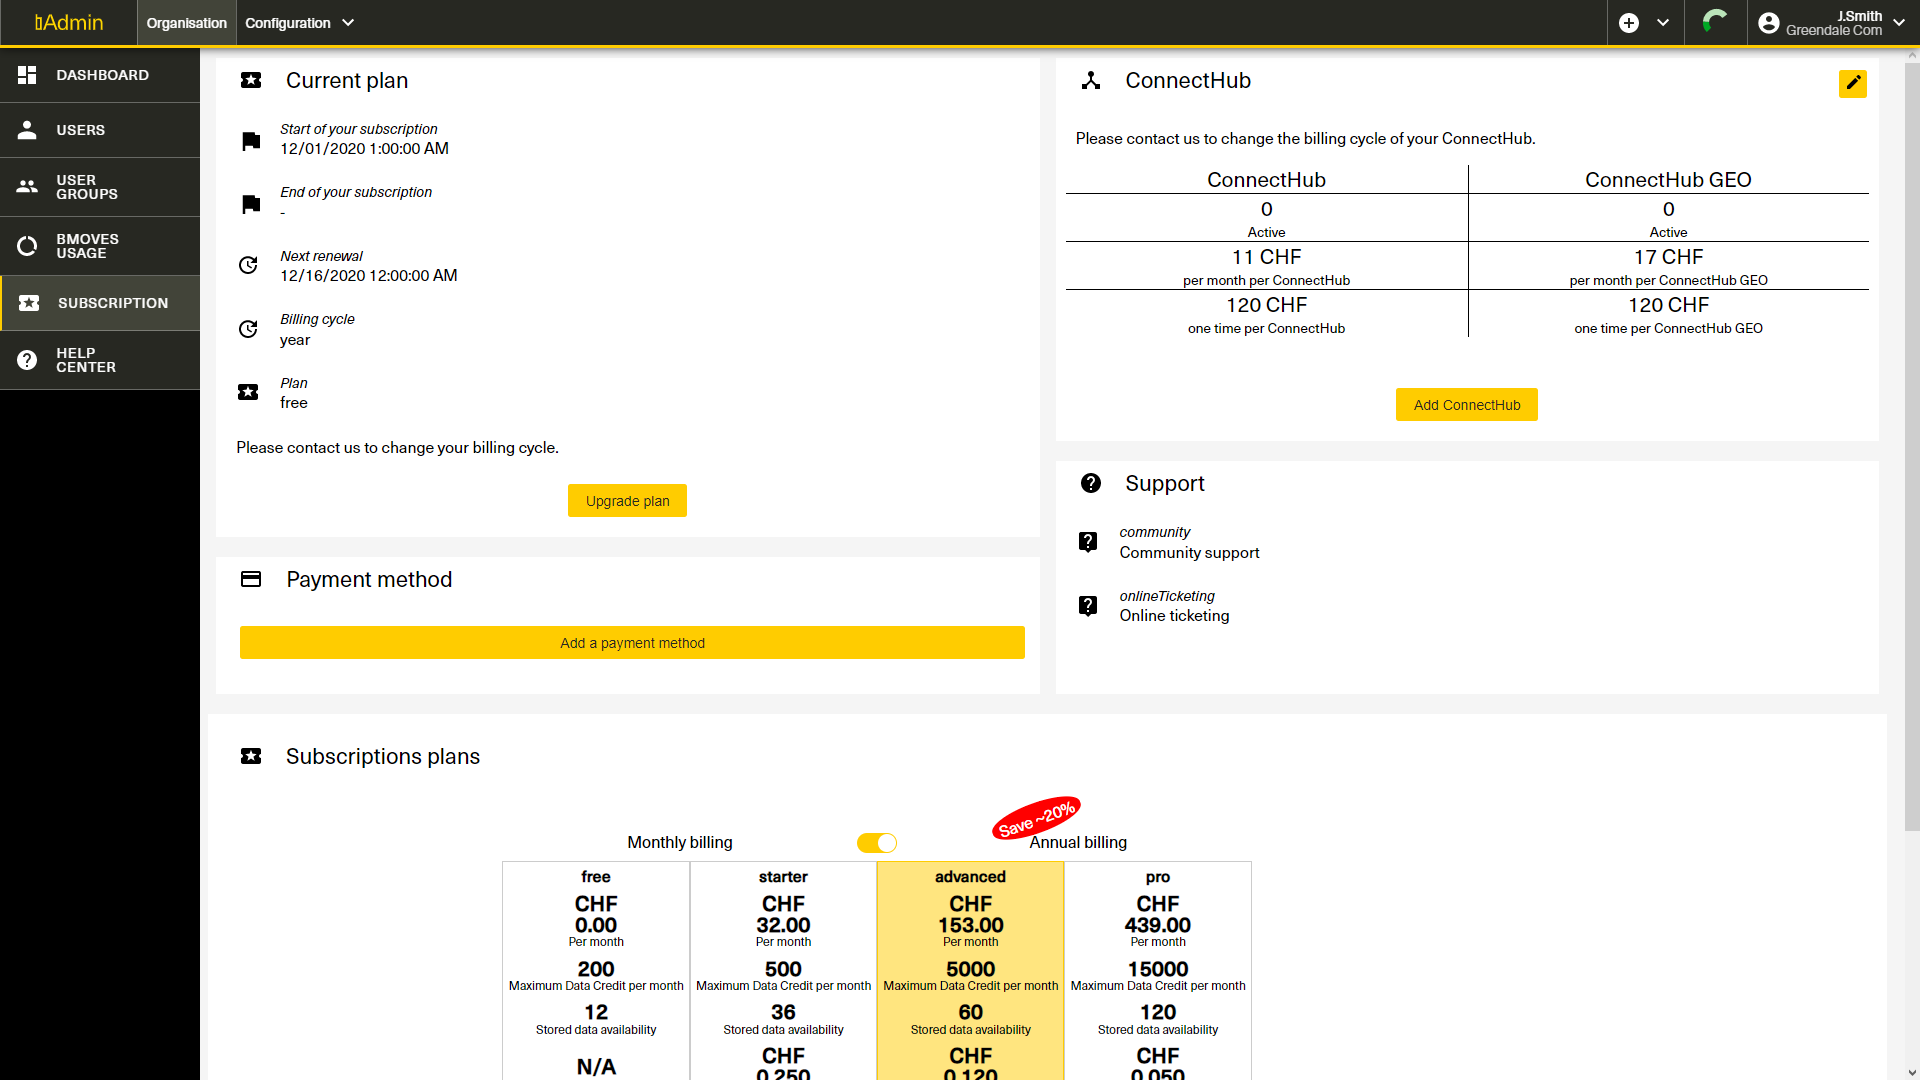
The subscription page displays a summary of your current subscription on the Current plan tile. On this tile, you can see the start of your subscription, the end of your subscription (if you cancel your subscription), the next renewal, the billing cycle and the current plan.
On the subscription page, you can also upgrade your subscription and subscribe to more ConnectHub or ConnectHub GEO.
- With every plan comes a limit of available Data Credits each month, historical availability and support, you can upgrade your plan at any time by selecting a higher tier plan.
- To subscribe to a new plan, click on the "SELECT" button of the plan you want on the bottom of your screen and follow the on-screen process.
- To subscribe to more ConnectHub or ConnectHub GEO, click on the yellow "Add ConnectHub" button and use the "+" button to add ConnectHub or ConnectHub GEO. When you have all the ConnectHub you need, click on the yellow "Save" button. Make sure that your address is correct because we will ship the hardware to this address.
13. Getting help
If you have a question about bMoves or are running into a problem. You have several ways of getting help. To access the help center in bAdmin, click on the Help Center tab in the left menu. You can also click on your username in the upper right corner and then click on help. You can get help for bMoves using our tools built for you :
- Frequently Asked Questions : Check our FAQ to get answers to your most common questions
- Community Support : Check our Community Support where our specialist and other users answer a lot of questions regarding bMoves.
- Open an online ticket : You can open a ticket directly online on bAdmin. Make sure to provide us with as many details as you can so that our team can better help you.
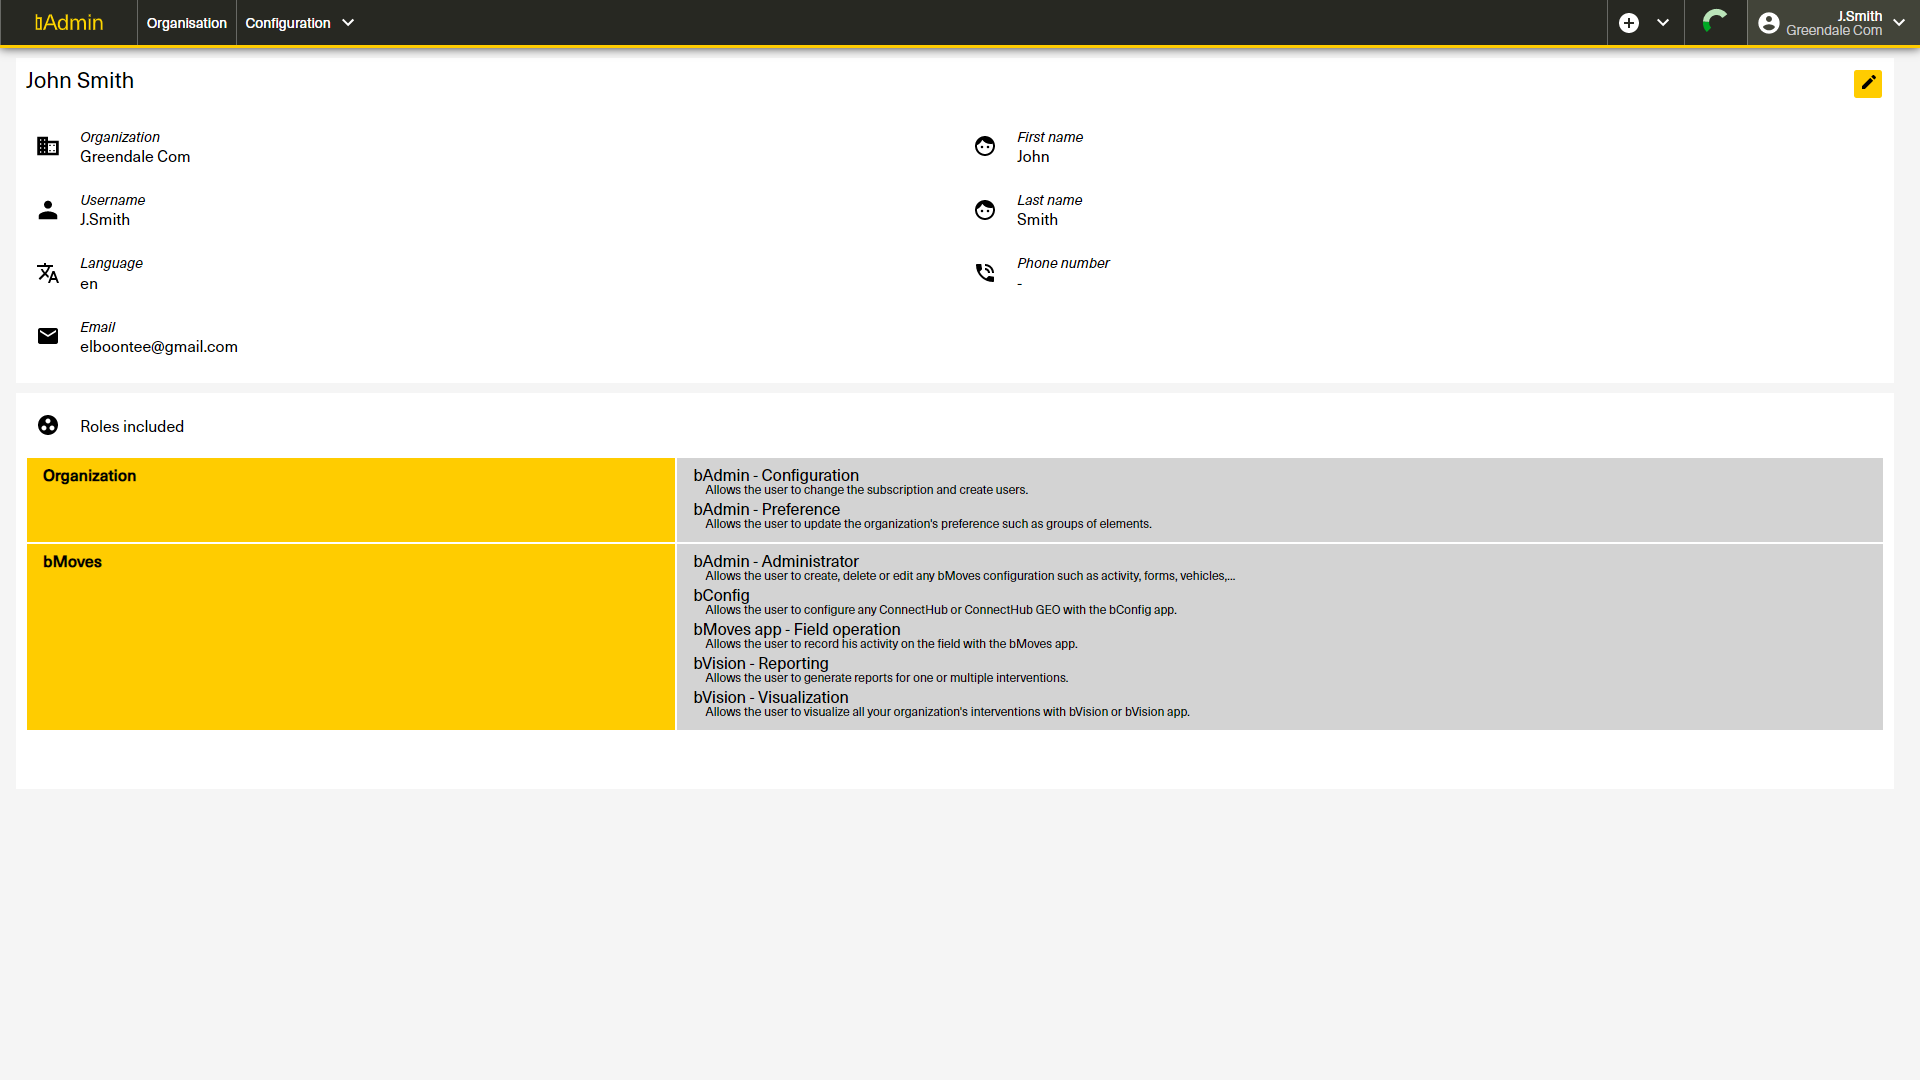
14. Profile
On bAdmin, you can check and edit your profile. To open your profile, click on your username and organization name in the top right corner and select Profile. On your profile page, you can edit your profile by clicking on the yellow pen button in the top right corner. You can then change all your information, including your password.
To change your user groups or the role you have access to do, you need to do this from the User or User Groups screen and you need the correct roles to do so.